Tinc VPN 配置参考
 Tinc VPN 是一个轻量级的 GNU 协议下的开源软件,通过隧道以及加密技术在互联网上建立点与点隧道。VPN 是 IP 层上的,可以像普通的网络设备那样,不需要去适配其他已经存在的软件。可以很安全的在点与点之间传输数据,还有几大的特点:
加密/认证/压缩
自动全网状路由
易于扩展网络节点
能够进行网络的桥接
跨平台与IPv6 支持
目录结构
/etc/tinc
└── freeoa
├── hosts
│ ├── Server
│ └── Client
├── rsa_key.priv
├── tinc.conf
├── tinc-down
└── tinc-up
/etc/tinc/freeoa 目录下的文件都属于freeoa这个网络
/etc/tinc/freeoa/hosts 目录是存放其他用户或者说是其他网络的public key以及他们的 ip 地址
rsa_key.priv 本网络的私钥
tinc.conf 本网络的配置文件
tinc-down 本网络关闭时执行的脚本
tinc-up 本网络启动时执行的脚本
服务端配置
首先开启 Linux 转发,在/etc/sysctl.conf设置net.ipv4.ip_forward = 1,并通过sysctl -p来应用配置。
修改tinc.conf配置文件
Name = Server
Interface = tinc
Mode = switch
Compression=9
Cipher = aes-256-cbc
Digest = sha256
PrivateKeyFile=/etc/tinc/freeoa/rsa_key.priv
Name 主机名称
Interface 隧道所使用的网卡名称
Mode 有三种模式,分别是 router / switch / hub ,相对应我们平时使用到的路由、交换机、集线器 (默认模式 router)
Compression UDP 数据包压缩级别。可选有 0 (关闭),1 (fast zlib) 至 9 (best zlib),10 (fast lzo) 和 11 (best lzo)
Cipher 加密类型,可选 aes-128-cbc aes-256-cbc 等
Digest rsa 加密协议强度。可选 sha128 sha1 等
PrivateKeyFile 服务器私钥的位置
修改tinc-up和tinc-down,用Windows作为服务器无需这两个文件
tinc-up
#!/bin/sh
ifconfig $INTERFACE <内网ip> netmask 255.255.255.0
tinc-down
#!/bin/sh
ifconfig $INTERFACE down
添加执行权限
chmod +x tinc-*
在hosts文件夹内添加节点配置文件
Subnet=10.1.3.1/32
Address=149.129.88.238
Port=57734
Subnet 宣告的路由地址
Address 服务器的外网 IP
Port 指定 tinc 连接端口(默认端口655)
生成私钥和公钥
tincd -n freeoa -K4096
公钥自动添加到hosts文件夹内的该节点配置文件
网络名就是freeoa,网卡接口名vpn,使用switch模式,以及如下的加密方式:
Name=freeoa
Interface=vpn
Mode=switch
Cipher=aes-256-cbc
Digest=sha256
新建hosts文件,这个文件名必须和tinc.conf内的Name一致:
vim /etc/tinc/freeoa/hosts/freeoa
写入如下配置:
Address = VPS公网IP
Subnet = 10.0.0.1/32
完成之后生成密匙对:
tincd -n freeoa -K4096
按两下回车全部保持默认配置,生成完成之后,对应的文件路径:
/etc/tinc/freeoa/rsa_key.priv # 私钥
/etc/tinc/freeoa/hosts/freeoa # 公钥
配置虚拟网卡tinc-up:
vim /etc/tinc/freeoa/tinc-up
#!/bin/sh
ifconfig $INTERFACE 10.0.0.1 netmask 255.255.255.0
ip指令
ip link set $INTERFACE up
ip addr add 10.0.0.1/32 dev $INTERFACE
ip route add 10.0.0.1/32 via 10.0.0.1
配置虚拟网卡tinc-down:
vim /etc/tinc/freeoa/tinc-down
#!/bin/sh
ifconfig $INTERFACE down
ip指令
ip link set $INTERFACE down
ip route del 10.0.0.1/32 via 10.0.0.1
给执行权限:
chmod +x /etc/tinc/freeoa/tinc-*
客户端配置
客户端的tinc.conf与服务器的参数基本上相同,只需要修改Name
在hosts文件夹内添加新的节点配置文件
Subnet=10.0.0.2/32
tinc-up和tinc-down跟服务器配置基本一样,只需要修改tinc-up的内网ip,Windows客户端无需这两个文件
生成私钥和公钥
tincd -n freeoa -K4096
将服务端的节点配置文件放到客户端的hosts文件夹内,并将客户端的节点配置文件放到服务端的hosts文件夹内
同样和之前一样新建一个freeoa的目录以及hosts目录:
mkdir -p /etc/tinc/freeoa && mkdir -p /etc/tinc/freeoa/hosts
新建tinc.conf配置文件:
vim /etc/tinc/freeoa/tinc.conf
写入如下配置,其中需要注意的是ConnectTo的值需要指定为服务端的网络名称,如果一样配置了加密,那么加密方式也需要和服务端对应:
Name=node_us
Interface=vpn
Mode=switch
ConnectTo=freeoa
Cipher=aes-256-cbc
Digest=sha256
新建hosts文件:
vim /etc/tinc/freeoa/hosts/node_us
Subnet = 10.0.0.3/32
生成密匙对:
tincd -n freeoa -K4096
配置虚拟网卡tinc-up:
vim /etc/tinc/freeoa/tinc-up
#!/bin/sh
ifconfig $INTERFACE 10.0.0.3 netmask 255.255.255.0
配置虚拟网卡tinc-down:
vim /etc/tinc/freeoa/tinc-down
#!/bin/sh
ifconfig $INTERFACE down
给执行权限:
chmod +x /etc/tinc/freeoa/tinc-*
现在我们需要交换公钥,首先把服务端的公钥复制到客户端内,再把客户端的公钥复制到服务端内,这样两台Linux之间就实现了内网互通。
接下来最主要的是如何把TincVPN放到Windows上运行(当作客户端)。其实配置起来大同小异,主要是参考了官方文档。
安装的时候一定要勾选TAP-Win64:进到安装软件的根目录,打开tap-win64目录,用管理员权限运行addtap.bat。
安装驱动之后打开网络连接看看有没有新增加一个TAP设备,回到软件根目录,新建一个网络(文件夹)我这边建立文件夹名称为freeoa,然后在freeoa这个文件夹内再新建一个hosts文件夹。接着在freeoa这个文件夹内新建一个tinc.conf,配置内容如下:
Name=node_family
Interface=vpn
Mode=switch
ConnectTo=freeoa
Cipher=aes-256-cbc
Digest=sha256
在hosts文件夹内新建一个node_family文件(名字必须和tinc.conf内的Name一致)写入如下配置:
Subnet = 10.0.0.4/32
之后用管理员权限打开CMD或者PowerShell,进入到软件根目录,生成密匙对:
cd tinc
./tincd -n freeoa -K4096
最后和服务端(VPS)交换公钥,也就是把node_family公钥文件上传到VPS的/etc/tinc/freeoa/hosts目录。同理,服务端上的freeoa公钥文件下载到本地的hosts文件夹下即可,文件夹下的结构与Linux上的一致即可。
hosts文件夹下就是服务端的公钥文件/客户端公钥文件,注意到我们之前在tinc.conf配置的虚拟网卡接口名是:
Interface=vpn
现在需要打开Windows的网络连接界面,把TAP-Win32 Adapter V9这个设备的名称改为vpn,接着为这个设备配置IP,配置的IP必须和node_family文件内的保持一致,创建服务:
tincd -n freeoa
最后在Windows的计算机管理,启动服务。
运行
后台启动
Windows 端需要先安装虚拟网卡,在 tinc 的安装目录下有虚拟网卡的驱动安装包,安装完成后需要将虚拟网卡名称改为与tinc.conf文件中的Interface名称相同,并且手动设置虚拟网卡的 IP 地址和子网掩码,然后进入到tinc的安装目录下再以管理员的身份运行,运行后会自动创建系统服务,需要停止的时候在 Windows 系统服务管理中停止服务。
#Linux/MacOS
tincd -n freeoa
#Windows(需要管理员权限)
tincd.exe -n freeoa
停止运行,该命令在 Windows 端会停止运行并删除系统服务。
#Linux/MacOS
tincd -n freeoa -k
#Windows(需要管理员权限)
tincd.exe -n freeoa -k
调试模式
#Linux/MacOS
tincd -n freeoa -D -d 3
#Windows
tincd.exe -n freeoa -D -d 3
下面再举一个在3台Linux机器上的示例(基于1.0.36)
安装目录:/opt/tinc
配置目录:/opt/tinc/etc
网络名称:myscl
服务器端(vpnserv)
root@htvm:/opt/tinc/etc# ls
hosts rsa_key.priv tinc.conf tinc-down tinc-up
# /opt/tinc/sbin/tincd -n myscl
Cannot open config file /opt/tinc/etc/tinc/myscl/tinc.conf: No such file or directory
Failed to read `/opt/tinc/etc/tinc/myscl/tinc.conf': No such file or directory
用如下的指令可解决问题
# /opt/tinc/sbin/tincd -c /opt/tinc/etc -n myscl -K4096
root@htvm:/opt/tinc/etc# cat tinc.conf
Name = vpnserv
Interface = vpn0
Mode = router
KeyExpire = 3600
Compression = 10
Cipher = aes-256-cbc
Digest = sha256
PrivateKeyFile=/opt/tinc/etc/rsa_key.priv
root@htvm:/opt/tinc/etc# cat hosts/vpnserv
Subnet=192.168.9.1/32
Address=67.0.1.2
Port=57722
-----BEGIN RSA PUBLIC KEY-----
...
-----END RSA PUBLIC KEY-----
root@htvm:/opt/tinc/etc# cat tinc-up
#!/bin/sh
ifconfig $INTERFACE 192.168.9.1 netmask 255.255.255.0
启动的过程中会生成临时变化文件,还需要相关的路径:
# /opt/tinc/sbin/tincd -c /opt/tinc/etc -n myscl
Both netname and configuration directory given, using the latter...
Couldn't write pid file /opt/tinc/var/run/tinc.myscl.pid: No such file or directory
mkdir -p /opt/tinc/var/run
# /opt/tinc/sbin/tincd -c /opt/tinc/etc -n myscl
Both netname and configuration directory given, using the latter...
root@htvm:~# ss -nplut|grep 577
udp UNCONN 0 0 *:57722 *:* users:(("tincd",pid=28811,fd=6))
udp UNCONN 0 0 :::57722 :::* users:(("tincd",pid=28811,fd=8))
tcp LISTEN 0 3 *:57722 *:* users:(("tincd",pid=28811,fd=5))
tcp LISTEN 0 3 :::57722 :::* users:(("tincd",pid=28811,fd=7))
# ifconfig
...
vpn0: flags=4163<UP,BROADCAST,RUNNING,MULTICAST> mtu 1500
inet 192.168.9.1 netmask 255.255.255.0 broadcast 192.168.9.255
inet6 fe80::d891:f4ff:fe7b:ab60 prefixlen 64 scopeid 0x20<link>
ether da:91:f4:7b:ab:60 txqueuelen 1000 (Ethernet)
RX packets 0 bytes 0 (0.0 B)
RX errors 0 dropped 0 overruns 0 frame 0
TX packets 10 bytes 732 (732.0 B)
TX errors 0 dropped 0 overruns 0 carrier 0 collisions 0
# /opt/tinc/sbin/tincd -c /opt/tinc/etc -n myscl -D -d3
Both netname and configuration directory given, using the latter...
tincd 1.0.36 starting, debug level 3
/dev/net/tun is a Linux tun/tap device (tap mode)
Executing script tinc-up
Listening on 0.0.0.0 port 53322
Listening on :: port 53322
Ready
No address specified for vpnc009
Trying to re-establish outgoing connection in 900 seconds
客户端(vpnc049)
root@wyp:/opt/tinc/etc# more tinc.conf
Name = vpnc049
Interface = vpn0
Mode = router
KeyExpire = 3600
Compression = 10
Cipher = aes-256-cbc
Digest = sha256
ConnectTo = vpnserv
PrivateKeyFile=/opt/tinc/etc/rsa_key.priv
root@wyp:/opt/tinc/etc# more hosts/vpnc049
Subnet=192.168.9.49/32
-----BEGIN RSA PUBLIC KEY-----
...
-----END RSA PUBLIC KEY-----
root@wyp:/opt/tinc/etc# more tinc-up
#!/bin/sh
ifconfig $INTERFACE 192.168.9.49 netmask 255.255.255.0
将htvm上的/opt/tinc/etc/hosts/vpnserv与/opt/tinc/etc/hosts/vpnc049文件相互复制后,启动各自己的进程:
/opt/tinc/sbin/tincd -c /opt/tinc/etc -n myscl
停止可通过执行:
/opt/tinc/sbin/tincd -c /opt/tinc/etc -n myscl -k
来实现。
注意:客户端的ConnectTo一定要写,不然启动后不会去连接,就自然不能互通了。
关于Windows客户端如何配置,其实有一个官网示例可供参考。首先下载Windows版的tinc,在安装过程三项可选,直接全选,然后指定安装目录之后进入安装目录(本例安装在:d:\programfiles\tinc)。
新建网络目录,本例为myscl
进入myscl目录后,创建hosts目录
在myscl目录下新建文件tinc.conf,输入如下内容:
Name = vpnc099
Interface = vpnx
ConnectTo = vpnserv
在hosts目录下新建文件vpnc099,输入如下内容,将节点IP配置为192.168.9.99:
Subnet = 192.168.9.99/32
在安装目录下以管理员身份启动cmd,输入tincd -n cloud -K4096,来生成密钥,待密钥生成完毕后,与vpnserv互换公钥文件(可能会有名称的更换)。
Generating 4096 bits keys:
....................................................................................................
....................................................................................................
...........................++++ p
....................................................................................................
....................................................................................................
....................................................................................................
....................................................................................................
................++++ q
Done.
在安装目录tap-win64下以管理员身份运行addtap.bat这个批处理脚本文件。

接着去网络中心找到类似的TAP网络适配器
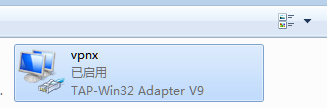
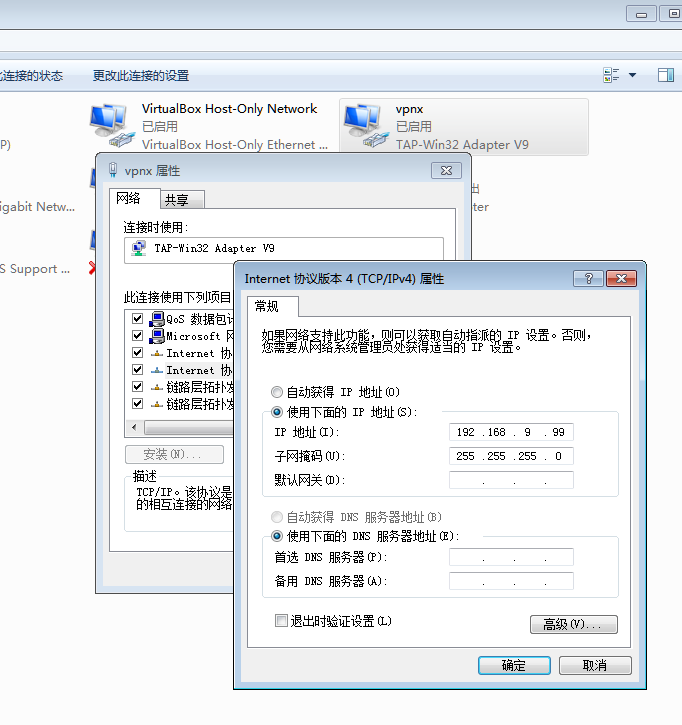
修改其名称为tinc.conf中的Interface值,本例为vpnx,接着右键属性设置ipv4的地址,此地址应与hosts中pc的Subnet值相同,本例为192.168.9.99,如下图所示:
Windows下需要在安装目录下以管理员身份运行cmd输入tincd -n myscl,如果成功会生成一个tinc.cloud的服务,服务默认是开机自动启动的。
D:\programfiles\tinc>tincd -n myscl
tinc.myscl service installed
tinc.myscl service started
注意:Windows下的路径不如Linux下那么灵活,所以文件的位置一定要按手册页中来指定。
参考来源:
Tinc VPN 大局域网实现备忘录
HOWTO_Setup_a_VPN_with_tinc
How to Set up tinc, a Peer-to-Peer VPN