理解Vyatta下NAT类型及用法
 NAT(network addresses translation),用来进行内、外网地址转换,具体可以参考理解NAT类型.
阅读本文需要有一定操作经验的网络及运维人员,如果觉得本文过于复杂,在这里有一篇较为简单的入门手册:vyatta nat设置入门
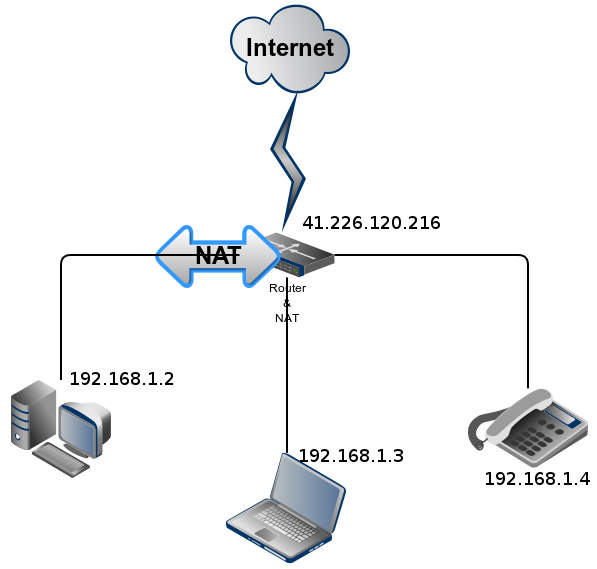
Vyatta NAT从内网到互联网的示意图
---------------
总览
Vyatta支持网络地址转换的各种选项,转换可以是以下类型之一:
vyatta支持如下nat类型:
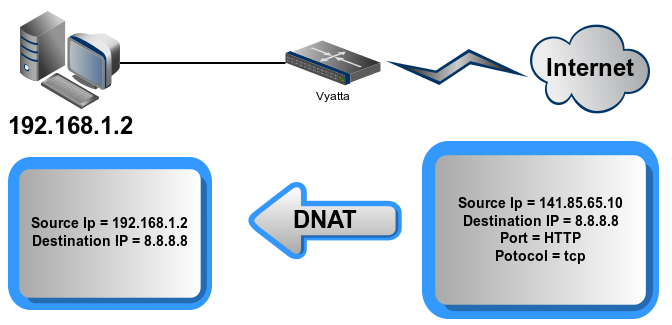
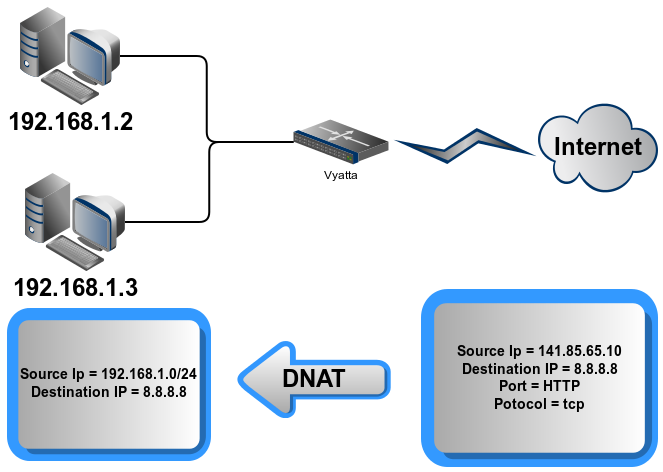
Destination (DNAT). A connection coming to router is forwarded inside the network.一个到路由器上并转发内部网络主机的连接。
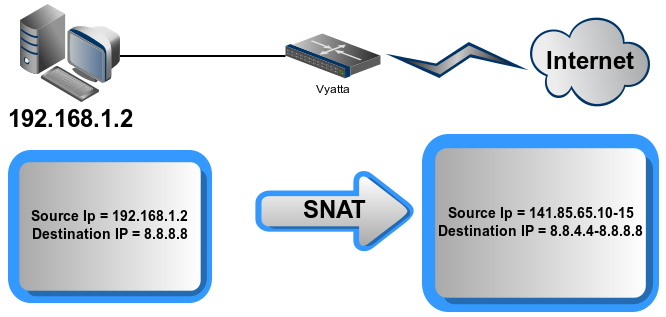
Source (SNAT). A connection originated from the local network is forwarded outside with source address substituted with specified address.源自于本地网络连接转发到外网,源地址替换指定的公网地址。
Masquerade. A connection from the local network is forwarded outside with the source address substituted with specified interface address. It's very similar to source, but will work even if WAN interface address is not static.从本地网络转发到外网的链接,源地址将会被替换为指定的接口地址。与源NAT是非常相似的(其实是SNAT特例),即使WAN接口地址不是静态的它也能很好地工作。
地址转换的类型方式:
One to one. Original source or destination address is substituted with a specified one.源或目的地址都是具体的(即ip-to-ip)。
One to many. Address after translation for a connection with specified address is picked from a subnet or range.将被连接的子网转换后为指定的地址(ip sub -t-ip)
Many to many. Address after translation for a connection with address from a specified range/subnet is picked from another subnet/range.一个指定子网到另一个子网地址转换(ip sub -to-ip sub)。
涉及到的相关术语:
Network interface.(网络接口)
Source or destination address.(源目标地址)
Source or destination port.(源或目标端口)
Protocol.(协议)
概括地讲,共有七种相关模式:
Source NAT (One-to-One) : forward packets from ONE INSIDE to ONE OUTSIDE
Source NAT (Many-to-One) : forward packets from MANY INSIDE to ONE OUTSIDE
Source NAT (Many-to-Many) : forward packets from MANY INSIDE to MANY OUTSIDE
Source NAT (One-to-Many) : forward packet from ONE INSIDE to MANY OUTSIDE
Destination NAT (One-to-One) : froward packets from ONE OUTSIDE to ONE INSIDE ( in this case, you probably think that there is no difference with the first NAT type, but this NAT is important if you want the source to receive “reply packet”)
Destination NAT (One-to-Many) : forward packets from ONE OUTSIDE to MANY INSIDE
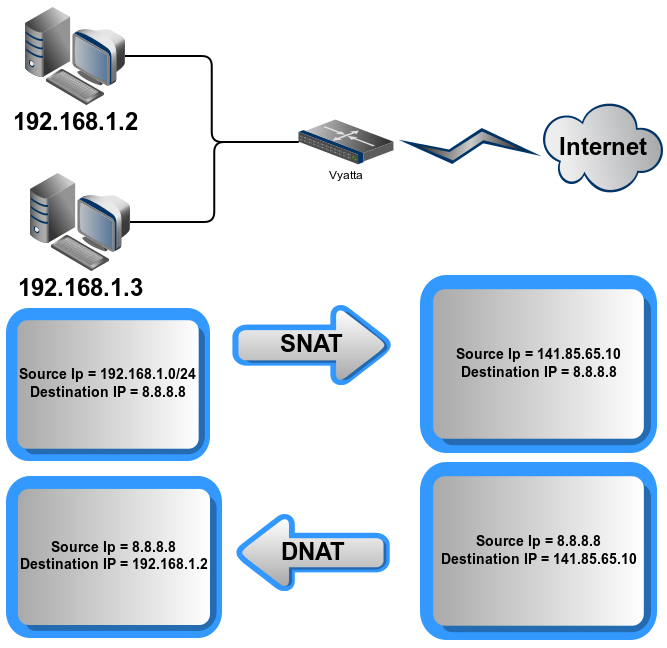
Bidirectional NAT : it’s equivalent of source NAT + destination NAT
---------------
配置
NAT可以通过'set nat'此类的指令来配置(老版本的是'set service nat‘),或进入它的编辑模式(edit nat)。
在系统中,配置规则以数字编号,且它们之间的间隔最好大一些(像 10,20,30来代替1,2,3),这样就可以在规则间的微调就容易些。
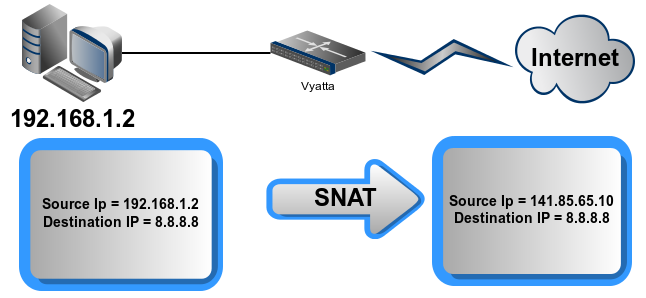
Source NAT
Source NAT is typically used for providing access to the Internet for a local network with only one public (routed) address. SNAT是从本地网络从一个固定的外网ip去访问公网。下列的配置设置了仅'192.168.30.11'这台机器能从'1.2.3.4'这个ip到公网,即one-to-one的NAT。
edit nat
set rule 10 description "LAN host to WAN"
set rule 10 type source
set rule 10 source address 192.168.30.11
set rule 10 outbound interface eth0
set rule 10 translation address 1.2.3.4
commit
#show nat source rule 10
outbound-interface eth0
source {
address 192.168.30.11
}
translation {
address 1.2.3.4
}
[edit]
"All connections from the source address 192.168.30.11 must be translated to source address 1.2.3.4 and originated from the interface eth0".即对源ip为"192.168.30.11'的请求将其转换'1.2.3.4'的地址后在到公网上。
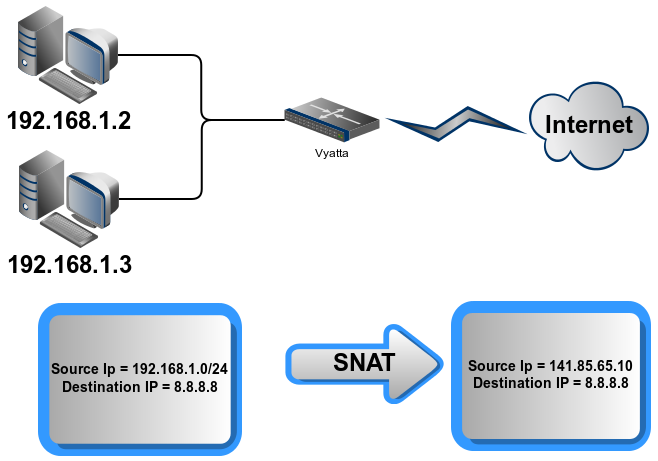
For the "source address" option you may specify address range or subnet. To give access for the whole local network you should use "source address 172.16.2.0/24", and to give it only to hosts with addresses from 172.16.2.5 to 172.16.2.10 use "source address 172.16.2.5-172.16.2.10".
'source address'可以是一个ip地址,或一个ip段(172.16.2.0/24),或一个区间段(192.168.30.11-192.168.30.19)。
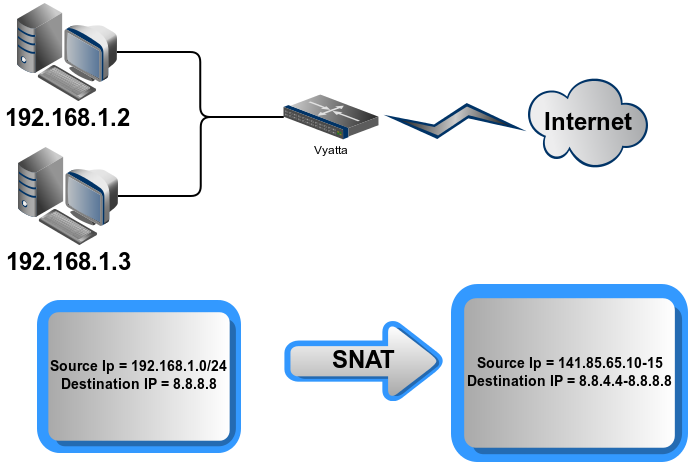
If you have a little subnet, which is not enough to give all your hosts puclic addresses, you may use many to many SNAT. To do it specify "translation address 1.2.3.4-14" for address range, or the whole your subnet and prefix length (like 1.2.3.4/29).
对于outside-address(出口的公网ip)可以像'source address'那样定义。
Ip 伪装(masquerade)
这是SNAT的一种特殊情况,但却有极广的应用,你可能目前就在用这种方式上网(如果你的机器上没有配置公网地址的话)。只需要指定出口,不用指定指定的公网ip,它能自动取得指定网口的ip地址,这对拨号用户极为受用。
vyatta@prouter# set nat source rule 10
[edit]
vyatta@prouter# set nat source rule 10 source address 172.18.0.0/24
[edit]
vyatta@prouter# set nat source rule 10 outbound-interface eth0
[edit]
vyatta@prouter# set nat source rule 10 translation address masquerade
[edit]
vyatta@prouter# commit
# show nat source rule 10
outbound-interface eth0
source {
address 172.18.0.0/24
}
translation {
address masquerade
}
[edit]
如果有多个公网地址,且想动态的使用它们进行均衡的话,可能参考这篇文章:vyatta多ip负载均衡
让NAT后面的机器使用固定公网ip上网
软路由上有多个公网ip地址,想其后内网机器使用指定的公网ip地址上网的设置方法。
rule 512 {
outbound-interface eth0
source {
address 192.168.30.12
}
translation {
address a.b.c.215
}
}
rule 1010 {
outbound-interface eth0
source {
address 192.168.30.0/24
}
translation {
address a.b.c.219-a.b.c.225
}
}
注:vyatta是按规则编号来处理,执行顺序按编号从小到大的匹配处理。所以一定将到特定ip的处理规则安排在通用的规则前面(上面的示例是从512开始执行,后才是1010)。可以在内网这台机器做访问测试(curl http://ip.cn curl http://ifconfig.me)看一下出去的公网ip是否正确,这样就不必将公网ip配置到具体的机器上,减少了暴露在互联网的风险,同时也方便管理地址(公网与内网)。以后我们还会将整个内网主机映射到公网上。
Destination NAT
DNAT changes the destination address of packets passing through the vRouter. DNAT is typically used when an external host needs to initiate a session with an internal (private) host. For example, translating a static public IP address to two internal server addresses, mapping them by a specific port. (DNAT改变数据包的目的地址通过vRouter,DNAT时通常使用一个外部主机需要启动一个会话与内部(私有)主机。最常见的用法是将公网内部机器上的服务通过这种nat映射到公网上,让公司外部也可以访问内部这台机器上的服务,就好像这个服务就在公网的ip一样)
大致的语法:
'nat-side-port'是路由器上的端口。
set nat destination rule 200 destination port <nat-side-port>
set nat destination rule 200 inbound-interface eth0
set nat destination rule 200 translation address <destination-host-ip>
set nat destination rule 200 translation port <destination-host-port>
set nat destination rule 200 protocol tcp
如果外网口上有多个公网ip的话,那就可能要指定具体的公网地址(段)了(set nat destination rule 200 destination address a.b.c.d/x)。
在外面访问公司内部的VNC服务来控制该机器(这里使用了多个端口)
VNC (Virtual Network Computing), protocol for remote GUI access uses port range 5900-6000.
rule 10 {
destination {
address $wanIP
port 5900-6000
}
inbound-interface $wanIface
inside-address {
address $lanIP
port 5900-6000
}
protocol tcp
type destination
}
[edit]
通过FTP访问公司内部的文件服务器
You just need to translate control connection to port 21, connection tracking engine will do the rest.(连接跟踪引擎将做其余的工作,这与ftp的使用模式相关的)
rule 160 {
destination {
address $wanIP
port 21
}
inbound-interface $wanIface
inside-address {
address $lanIP
port 21
}
protocol tcp
type destination
}
下面是一个radmin管理端口的示例:
# show nat destination rule 4821
destination {
port 4821
}
inbound-interface eth0
protocol tcp
translation {
address 192.168.31.121
port 4801
}
[edit]
同样也可以将公网口的端口映射到内网的组机器上:
# set nat destination rule 10
# set nat destination rule 10 inbound‐interface eth0
# set nat destination rule 10 destination address 12.34.56.78
# set nat destination rule 10 translation 10.0.0.64-10.0.0.79
# commit
# show nat destination rule 10
destination {
address 12.34.56.78
}
inbound‐interface eth0
translation {
address 10.0.0.64‐10.0.0.79
}
Conditional SNAT(条件SNAT)
Translation can be done only for specific connections. For example, you may create the following rule to originate all SMTP connections from your LAN from only one external address.
只对特定的连接,比如可以创建让局域网中所有的SMTP服务连接只从一个外部地址出去。
edit service nat
set rule 10 description "SMTP"
set rule 10 type source
set rule 10 source address 172.16.2.0/24
set rule 10 outbound interface eth0
set rule 10 outside-address address 1.2.3.8
set rule 10 protocol tcp
set rule 10 destination port smtp
commit
Note that if you want to specify the port you need to specify protocol tcp, udp or tcp/udp for both of them. It's because any IP protocol can be speficied (e.g. gre, ospf, icmp), and most part of them don't know what is "port".
tcp或udp端口号可以通过其数字或别名来指定。下例是将内网映射到公网上,外界对它的访问是透明的,感觉不到防火墙/软路由的存在。
1.1.1.2 =Public IP
10.0.0.10 = Private IP
configure
edit nat source rule 5
set source address 10.0.0.10
set outbound-interface eth0
set translation address 1.1.1.2
edit nat destination rule 5
set destination address 1.1.1.2
set translation address 10.0.0.10
set inbound-interface eth0
---------------
总结
这里较为全面地介绍了vyatta下nat的工作方式,并对有相关的方式的使用情形做了示例说明。
---------------
参考来源