Linux下一些防火墙工具使用入门

Apf 防火墙使用入门
RHEL7中的防火墙Firewall
中度对比Iptables与FirewallD
Using Firewalld in CentOS 7
Apf 防火墙使用入门
配置
#vim /etc/apf/conf.apf
默认的参数适合大多数场合,按照需要进行修改即可
DEVEL_MODE="1" >> DEVEL_MODE="0"
RAB="0" >> RAB="1"
RAB_PSCAN_LEVEL="2" >> RAB_PSCAN_LEVEL="3"
TCR_PASS="1" >> TCR_PASS="0"
DLIST_PHP="0" >> DLIST_PHP="1"
DLIST_SPAMHAUS="0" >> DLIST_SPAMHAUS="1"
DLIST_DSHIELD="0" >> DLIST_DSHIELD="1"
DLIST_RESERVED="0" >> DLIST_RESERVED="1"
说明:
/*禁用调试模式,不过这个是在你确定配置正确之后才修改的。在调试模式下APF会每5分钟重新刷新配置,避免错误配置造成服务器无法提供服务。*/
DEVEL_MODE="1" > DEVEL_MODE="0"
/*开启阻止地址响应,他允许防火墙跟踪并阻止一些和重要策略冲突的地址*/
RAB="0" >RAB="1"
/*选择RAB的端口扫描等级,0是禁止,1是低安全,2是中等安全,3是高等安全*/
RAB_PSCAN_LEVEL="2" > RAB_PSCAN_LEVEL="3"
/*禁止traceroute请求在定义的范围内*/
TCR_PASS="1" > TCR_PASS="0"
/*启用阻止列表,这里的列表来自网络上rfxn.com、www.spamhaus.org和feeds.dshield.org,主要包含了如垃圾邮件的黑名单,DShield公司手机的恶意活动名单*/
DLIST_PHP="0" > DLIST_PHP="1"
DLIST_SPAMHAUS="0" >DLIST_SPAMHAUS="1"
DLIST_DSHIELD="0" > DLIST_DSHIELD="1"
DLIST_RESERVED="0" > DLIST_RESERVED="1"
接下来就是针对我们的服务进行配置了
/*指定数据包进出的网卡*/
IFACE_IN="eth0"
IFACE_OUT="eth0"
/*指定相信的网段一般是DMZ和VPN等*/
IFACE_TRUSTED=""
/*允许被访问的TCP和UDP的端口*/
IG_TCP_CPORTS="”
IG_UDP_CPORTS="”
/*允许出口数据包过滤,允许对外访问的端口*/
EGF="1"
EG_TCP_CPORTS="”
EG_UDP_CPORTS="”
/*对于进出的ICMP协议过滤*/
IG_ICMP_TYPES=""
EG_ICMP_TYPES=""
流入端口过滤
# Common ingress (inbound) TCP ports
IG_TCP_CPORTS="20,21,22,25,26,53,80,110,143,443,465,993,995,3306"
# Common ingress (inbound) UDP ports
IG_UDP_CPORTS="21,53,465"
流出端口过滤
# Outbound (egress) filtering
EGF="1"
# Common outbound (egress) TCP ports
EG_TCP_CPORTS="21,22,25,26,37,43,53,80,110,113,443,465,3306"
# Common outbound (egress) UDP ports
EG_UDP_CPORTS="20,21,53,465"
ICMP过滤
# Common ICMP outbound (egress) types
# 'internals/icmp.types' for type definition; 'all' is wildcard for any
EG_ICMP_TYPES="all"
另外还有两个值得注意的设置文件: /etc/apf/allow_hosts.rules 和 /etc/apf/deny_hosts.rules 可设置目标主机的过滤规则,如添加信任主机操作等。
控制APF
查看运行日志
#tail -f /var/log/apf_log
apf -s # 启动APF防火墙
apf -r # 重启APF防火墙
apf -f # 刷新APF防火墙配置文件
apf -l # 列出APF的配置信息,与iptables -nL类似
apf -t # APF的日志信息
apf -e # 将域名解释加入信认规则
apf -st # APF信息统计。主要包括白名单,黑名单信息。
apf -a IP地址/IP段(FQDN) "注释" # 将IP/IP段添加到白名单
apf -d IP地址/IP段(FQDN) "注释" # 将IP/IP段添加到黑名单
apf -u # 将IP/IP段从白/黑名单中删除
apf -o # 将IP/IP段从白/黑名单中删除
添加为系统启动
#vim /etc/rc.local
在其中添加 "/usr/local/sbin/apf -s" 即可(不含双引号).
参数说明
usage /usr/local/sbin/apf [OPTION]
-s|--start ......................... load all firewall rules
-r|--restart ....................... stop (flush) & reload firewall rules
-f|--stop........ .................. stop (flush) all firewall rules
-l|--list .......................... list all firewall rules
-t|--status ........................ output firewall status log
-e|--refresh ....................... refresh & resolve dns names in trust rules
-a HOST CMT|--allow HOST COMMENT ... add host (IP/FQDN) to allow_hosts.rules and
immediately load new rule into firewall
-d HOST CMT|--deny HOST COMMENT .... add host (IP/FQDN) to deny_hosts.rules and
immediately load new rule into firewall
-u|--remove HOST ................... remove host from [glob]*_hosts.rules
and immediately remove rule from firewall
-o|--ovars ......................... output all configuration options
规则
在/etc/apf/有2个文件:allow_hosts.rules和deny_hists.rules,这2分文件用来配置允许或禁止远程主机访问本地某服务的。
# 在/etc/apf/allow_hosts.rules添加如下信息:
tcp:in:d=22:s=远程主机地址、网段、域名
out:d=22:d=远程主机地址、网段、域名
# 在/etc/apf/deny_hosts.rules添加如下信息:
tcp:in:d=22:s=远程主机地址、网段、域名
out:d=22:d=远程主机地址、网段、域名
具体例子可以看上述2个文档。
查看产生的策略
可以通过iptables –L -nv,也可通过apf命令来查看
#apf –l
不要只在allow_hosts.rules里面加就以为可以了,也要在deny_hosts.rules加上了相应的规则后,不然会在连接时就提示超时了。allow_hosts.rules和deny_hosts.rules里面都加了规则后,重起apf就会提示配置成功的信息。
注意:APF自9.6 (rev:2)版本之后增加了RAB模块,该模块取代了旧版本的antidos模块,可有效减轻拒绝服务攻击带来的影响;但需要iptables的内核模块ipt_recent的支持,因此建议在内核支持以及iptables模块支持的情况下使用。
有关问题
Problem: If you get this error apf(xxxxx): {glob} unable to load iptables module (ip_tables), aborting.
Solution: Try changing SET_MONOKERN=”0″ to SET_MONOKERN=”1″ , then apf -r
Problem: If you get this message: apf(xxxxx): {glob} !!DEVELOPMENT MODE ENABLED!! – firewall will flush every 5 minutes.
Solution: you need to change DEVEL_MODE=1 to DEVEL_MODE=0, make sure your config is working first.
RHEL7中的防火墙Firewall
从 rhel7开始,系统推荐使用 firewall 来替代原先的 iptables,firewall 也是默认的 rhel 的防火墙配置。网上已经有很多文章介绍 firewall 和 iptables 的不同:
firewall 预设了9个 zone,每个 zone 可以有个性化的规则,这样当你的服务器/个人电脑 处于不同的环境下时,你就可以很方便的一键切换配置了。
firewall 的配置项发生修改时,可以进行热生效;而 iptables 只能通过重启服务来实现。
firewall 从命令行或从配置内容上,更加人性化。例如可以配置服务内容 ssh、http、https 等,这些就相当于开启了22端口、80端口和443端口的接入权限。
常用命令
这里介绍几个常用的命令,如果想要更深入地研究firewall,请移步文章末尾的参考部分,里面有更详细地介绍。
开篇已经提到了,其实 iptables 和 firewall 是两个工具,我们已经知道了 firewall 有几个默认的区域,从命令行我们也能看到,同时在文件夹/etc/firewalld/zones文件夹里面可以看到所有的区域。当然我们自定义的区域也会在该目录下产生一个 xml 文件,里面就记录了这个区域的所有配置信息,包括绑定的网卡、允许的服务、端口等信息。
以下是一个典型的区域配置文件内容:
<?xml version="1.0" encoding="utf-8"?>
<zone>
<short>Public</short>
<description>For use in public areas. You do not trust the other computers on networks to not harm your computer. Only selected incoming connections are accepted.</description>
<interface name="eth0"/>
<service name="ssh"/>
<service name="dhcpv6-client"/>
<service name="http"/>
<service name="https"/>
</zone>
我们看到在/etc/firewalld目录中,除了有zones文件夹外,还有一个services文件夹。同zones 一样,services 定义了一些常见的 service 的端口、协议等内容,你可以自行查看,包括 ssh, http, https, mysql 等一些我们常用的熟悉的服务,都已经被预置进去了。
如果你激活了 firewall,你依旧可以通过输入iptables -L命令来查看 iptables 的配置,你会发现,通过 firewall 配置的规则,在 iptables 中也一样出现了。
firewall 已经是 rhel/CentOS7中默认安装好的,所以我们只需要把他启动就好了。注意,在 rhel7的内核中,系统操作的命令已经变成了systemctl start/stop/restart xxx,当然在rhel6内核中习惯用的 service xxx start/stop/restart依然是可以用的。
$ systemctl start firewalld
基本查看命令
$ firewall-cmd --state # 查看firewall状态
$ firewall-cmd --get-default-zone # 查看默认的 zone
$ firewall-cmd --set-default-zone=dmz # 修改默认的 zone 为 dmz
$ firewall-cmd --get-active-zone # 查看目前激活的 zone
$ firewall-cmd --zone=public --list-all # 查看指定 zone 的配置信息
注:default-zone指的是我们在输入命令时,可以省去--zone=xxx这个参数后,默认查看/修改的 zone 信息。默认的 default zone 是public,我们可以通过set-default-zone命令来修改默认的 zone。active-zone 指的是当前系统的网卡绑定在的zone,后面我们将介绍如果修改网卡所在 zone 实现防火墙配置的快速切换。
常用修改命令
$ firewall-cmd --zone=dmz --change-interface=eth0 # 修改 dmz 区域的网卡为 eth0
$ firewall-cmd --zone=public --add-service=http # 新增 public 区域允许 http 服务接入(立即生效)
$ firewall-cmd --zone=internal --remove-service=https --permanent # 移除 internal 区域的 https 服务接入权限(永久生效)
$ firewall-cmd --zone=dmz --add-port=8080/tcp --permanent # 在 dmz 区域新增8080端口允许 tcp 协议接入(永久生效)
$ firewall-cmd --zone=dmz --remove-port=8080/tcp --permanent # 在 dmz 区域删除8080端口的接入权限(永久生效)
$ firewall-cmd --reload # 热重载当前的配置方案(使permanent的配置生效)
注:permanent参数表示永久生效,但是加了该参数后,你需要reload才能使命令生效;如果不加该参数,则命令会立即生效,但是当 firewall 服务被完全重启时,该配置会失效。当chage-interface修改绑定网卡时,不需要加入参数 permanent;但是其他命令加入permanent参数可以让设置永久生效
bash-completion
发现其实 firewall 的相关命令参数都非常长,其实 rhel7的内核已经提供了命令行参数补全的工具,只不过我们一般都是安装的最小版本的 rhel/centos,所以我们需要额外安装才能生效:
yum install bash-completion
记得要退出 bash 并重新进入才能生效,之后就可以通过 tab 来自动补全相关命令参数了。
中度对比Iptables与FirewallD
CentOS从7.0 开始将原先的防火墙iptables换成了FirewallD。FirewallD支持 IPv4, IPv6 防火墙设置以及以太网桥接,并且拥有运行时配置和永久配置选项,被称作动态管理防火墙,也就是说不需要重启整个防火墙便可应用更改。CentOS 7默认安装了firewalld,若没有安装,执行 yum install firewalld firewalld-config安装,其中firewalld-config是GUI工具。
netfilter
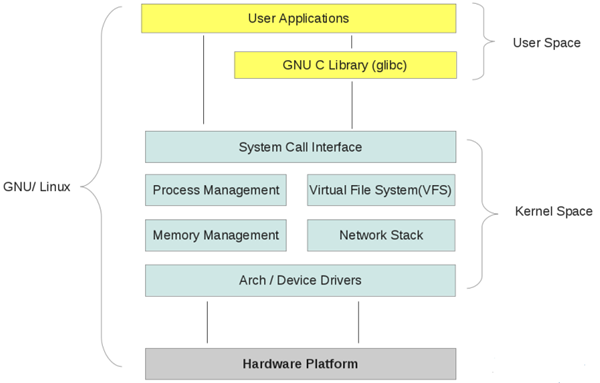
iptables、firewalld这些软件本身其实并不具备防火墙功能,他们的作用都是在用户空间中管理和维护规则,只不过规则结构和使用方法不一样罢了,真正利用规则进行过滤是由内核的netfilter完成的。netfilter是Linux 2.4内核引入的包过滤引擎。由一些数据包过滤表组成,这些表包含内核用来控制信息包过滤的规则集。iptables、firewalld等等都是在用户空间修改过滤表规则的便捷工具。
Linux内部结构可以分为三部分,从最底层到最上层依次是:硬件–>内核空间–>用户空间
netfilter在数据包必须经过且可以读取规则的位置,共设有5个控制关卡。这5个关卡处的检查规则分别放在5个规则链中:
PREROUTING 数据包刚进入网络接口之后,路由之前
INPUT 数据包从内核流入用户空间
FORWARD 在内核空间中,从一个网络接口进入,到另一个网络接口去。转发过滤
OUTPUT 数据包从用户空间流出到内核空间
POSTROUTING 路由后,数据包离开网络接口前
链其实就是包含众多规则的检查清单,每一条链中包含很多规则。当一个数据包到达一个链时,系统就会从链中第一条规则开始检查,看该数据包是否满足规则所定义的条件。如果满足,系统就会根据该条规则所定义的方法处理该数据包;否则就继续检查下一条规则,如果该数据包不符合链中任一条规则,系统就会根据该链预先定义的默认策略来处理数据包。
当一个数据包进入网卡时,它首先进入PREROUTING链,内核根据数据包目的IP判断是否需要转送出去。如果数据包就是进入本机的,它就会沿着图向下移动,到达INPUT链。数据包到了INPUT链后,任何进程都会收到它。本机上运行的程序可以发送数据包,这些数据包会经过OUTPUT链,然后到达POSTROUTING链输出。如果数据包是要转发出去的,且内核允许转发,数据包就会如图所示向右移动,经过FORWARD链,然后到达POSTROUTING链输出
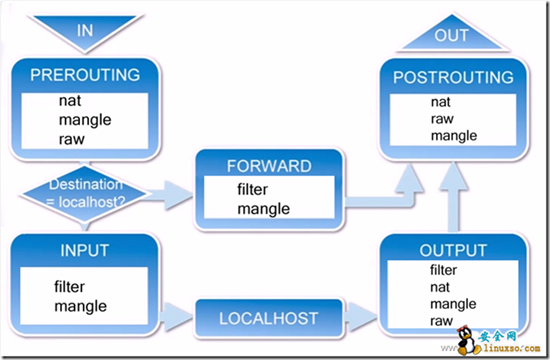
可以看出,刚从网络接口进入的数据包尚未进行路由决策,还不知道数据要走向哪里,所以进出口处没办法实现数据过滤,需要在内核空间设置转发关卡、进入用户空间关卡和离开用户空间关卡。
iptables
iptablses按照用途和使用场合,将5条链各自切分到五张不同的表中。也就是说每张表中可以按需要单独为某些链配置规则。例如,mangle表和filter表中都能为INPUT链配置规则,当数据包流经INPUT位置(进入用户空间),这两个表中INPUT链的规则都会用来做过滤检查。
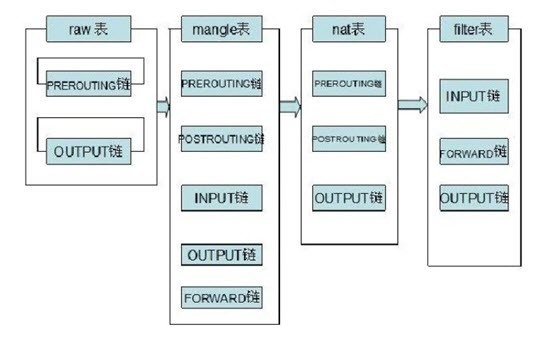
五张表,每张表侧重于不同的功能:
filter 数据包过滤功能。只涉及INPUT, FORWARD, OUTPUT三条链。是iptables命令默认操纵的表。
nat 地址转换功能。NAT转换只涉及PREROUTING, OUTPUT, POSTOUTING三条链。可通过转发让局域网机器连接互联网
mangle 数据包修改功能。每条链上都可以做修改操作。修改报文元数据,做防火墙标记等。
raw 快速通道功能。为了提高效率,优先级最高,符合raw表规则的数据包会跳过一些检查。
security 需要和selinux结合使用,内置规则比较复杂,通常都会被关闭。
iptables还支持自定义规则链。自定义的链必须和某个特定的链关联起来。可在某个链中设定规则,满足一定条件的数据包跳转到某个目标链处理,目标链处理完成后返回当前链中继续处理后续规则。因为链中规则是从头到尾依次检查的,所以规则的次序是非常重要的。越严格的规则应该越靠前。
iptablse服务管理
service iptables start|stop|restart|status
service iptables save //定义的所有内容,在重启时都会失效。调用save命令可以把规则保存到文件/etc/sysconfig/iptables中。
iptables-save //保存规则
iptables-restore //加载规则。开机的时候,会自动加载/etc/sysconfig/iptables
iptables-restore < /etc/sysconfig/iptables2 //加载自定义的规则文件
//iptables服务配置文件:/etc/sysconfig/iptables-config
//iptables规则文件:/etc/sysconfig/iptables
echo "1">/proc/sys/net/ipv4/ip_forward //打开iptables转发
iptables命令参考
iptables [-t TABLE] COMMAND [CHAIN] [CRETIRIA]... [-j ACTION]
缺省表名为filter,命令中用到的序号(RULENUM)都基于1。
COMMAND 命令选项
-A|--append CHAIN //链尾添加新规则
-D|--delete CHAIN [RULENUM] //删除链中规则,按需序号或内容确定要删除的规则
-I|--insert CHAIN [RULENUM] //在链中插入一条新的规则,默认插在开头
-R|--replace CHAIN RULENUM //替换、修改一条规则,按序号或内容确定
-L|--list [CHAIN [RULENUM]] //列出指定链或所有链中指定规则或所有规则
-S|--list-urles [CHAIN [RULENUM]] //显示链中规则
-F|--flush [CHAIN] //清空指定链或所有链中规则
-Z|--zero [CHAIN [RULENUM]] //重置指定链或所有链的计数器(匹配的数据包数和流量字节数)
-N|--new-chain CHAIN //新建自定义规则链
-X|--delete-cahin [CHAIN] //删除指定表中用户自定义的规则链
-E|--rename-chain OLDCHAIN NEWCHAIN //重命名链,移动任何引用
-P|-policy CHAIN TARGET //设置链的默认策略,数据包未匹配任意一条规则就按此策略处理
CRETIRIA 条件匹配
分为基本匹配和扩展匹配,扩展匹配又分为隐式匹配和显示匹配。
基本匹配:(可使用 ! 可以否定一个子句,如-p !tcp)
-p|--proto PROTO //按协议匹配,如tcp、udp、icmp,all表示所有协议。(/etc/protocols中的协议名)
-s|--source ADDRESS[/mask]... //按数据包的源地址匹配,可使用IP地址、网络地址、主机名、域名
-d|--destination ADDRESS[/mask]... //按目标地址匹配,可使用IP地址、网络地址、主机名、域名
-i|--in-interface INPUTNAME[ +] //按入站接口(网卡)名匹配,+用于通配。如 eth0, eth+ 。一般用在INPUT和PREROUTING链
-o|--out-interface OUTPUTNAME[+] //按出站接口(网卡)名匹配,+用于通配。如 eth0, eth+ 。一般用在OUTPUT和POSTROUTING链
扩展匹配:(如: -p tcp -m tcp –dport 80)
-m|--match MATCHTYPE EXTENSIONMATCH... //扩展匹配,可能加载extension
隐式扩展匹配
对-p PROTO的扩展,或者说是-p PROTO的附加匹配条件,-m PROTO 可以省略,所以叫隐式
-m tcp //-p tcp的扩展
--sport [!]N[:M] //源端口, 服务名、端口、端口范围。
--dport [!]N[:M] //目标端口,服务名、端口、端口范围
--tcp-flags CHECKFLAGS FLAGSOFTRUE //TCP标志位:SYN(同步),ACK(应答),RST(重置),FIN(结束),URG(紧急),PSH(强迫推送)。多个标志位逗号分隔。
//CHECKFLAGS为要检查的标志位,FLAGSOFTRUE为必须为1的标志位(其余的应该为0)
--syn //第一次握手。 等效于 --tcpflags syn,ack,fin,rst syn 四个标志中只有syn为1
-m udp //-p udp的扩展
--sport N[-M]
--dport N[-M]
-m icmp //隐含条件为-p icmp
--icmp-type N //8:echo-request 0:echo-reply
显示扩展匹配
-m state
--state //连接状态检测,NEW,ESTABLISHED,RELATED,INVALID
-m multiport
--source-ports PORT[,PORT]...|N:M //多个源端口,多个端口用逗号分隔,
--destination-ports PORT[,PORT]...|N:M //多个目的端口
--ports //多个端口,每个包的源端口和目的端口相同才会匹配
-m limit
--limit N/UNIT //速率,如3/minute, 1/s, n/second , n/day
--limit-burst N //峰值速率,如100,表示最大不能超过100个数据包
-m connlimit
--connlimit-above N //多于n个,前面加!取反
-m iprange
--src-range IP-IP
--dst-range IP-IP
-m mac
--mac-source //mac地址限制,不能用在OUTPUT和POSTROUTING规则链上,因为封包要送到网卡后,才能由网卡驱动程序透过ARP 通讯协议查出目的地的MAC 地址
-m string
--algo [bm|kmp] //匹配算法
--string "PATTERN" //匹配字符模式
-m recent
--name //设定列表名称,默认为DEFAULT
--rsource //源地址
--rdest //目的地址
--set //添加源地址的包到列表中
--update //每次建立连接都更新列表
--rcheck //检查地址是否在列表
--seconds //指定时间。必须与--rcheck或--update配合使用
--hitcount //命中次数。必须和--rcheck或--update配合使用
--remove //在列表中删除地址
-m time
--timestart h:mm
--timestop hh:mm
--days DAYS //Mon,Tue,Wed,Thu,Fri,Sat,Sun; 逗号分隔
-m mark
--mark N //是否包含标记号N
-m owner
--uid-owner 500 //用来匹配来自本机的封包,是否为某特定使用者所产生的,可以避免服务器使用root或其它身分将敏感数据传送出
--gid-owner O //用来匹配来自本机的封包,是否为某特定使用者群组所产生的
--pid-owner 78 //用来匹配来自本机的封包,是否为某特定进程所产生的
--sid-owner 100 //用来匹配来自本机的封包,是否为某特定连接(Session ID)的响应封包
ACTION 目标策略(TARGET)
-j|--jump TARGET //跳转到目标规则,可能加载target extension
-g|--goto CHAIN //跳转到指定链,不再返回
ACCEPT 规则验证通过,不再检查当前链的后续规则,直接跳到下一个规则链。
DROP 直接丢弃数据包,不给任何回应。中断过滤。
REJECT 拒绝数据包通过,会返回响应信息。中断过滤。
--reject-with tcp-reset|port-unreachable|echo-reply
LOG 在/var/log/messages文件中记录日志,然后将数据包传递给下一条规则。详细位置可查看/etc/syslog.conf配置文件
--log-prefix "INPUT packets"
ULOG 更广范围的日志记录信息
QUEUE 防火墙将数据包移交到用户空间,通过一个内核模块把包交给本地用户程序。中断过滤。
RETURN 防火墙停止执行当前链中的后续规则,并返回到调用链。主要用在自定义链中。
custom_chain 转向自定义规则链
DNAT 目标地址转换,改变数据包的目标地址。外网访问内网资源,主要用在PREROUTING。完成后跳到下一个规则链
--to-destination ADDRESS[-ADDRESS][:PORT[-PORT]]
SNAT 源地址转换,改变数据包的源地址。内网访问外网资源。主机的IP地址必须是静态的,主要用在POSTROUTING。完成后跳到下一个规则链。
--to-source ADDRESS[-ADDRESS][:PORT[-PORT]]
MASQUERADE 源地址伪装,用于主机IP是ISP动态分配的情况,会从网卡读取主机IP。直接跳到下一个规则链。
--to-ports 1024-31000
REDIRECT 数据包重定向,主要是端口重定向,把包分流。处理完成后继续匹配其他规则。能会用这个功能来迫使站点上的所有Web流量都通过一个Web高速缓存,比如Squid。
--to-ports 8080
MARK 打防火墙标记。继续匹配规则。
--set-mark 2
MIRROR 发送包之前交换IP源和目的地址,将数据包返回。中断过滤。
辅助选项:
-t|--table TABLE //指定操作的表,默认的表为filter
-n|--numeric //用数字形式显示地址和端口,显示主机IP地址而不是主机名
-x|--exact //计数器显示精确值,不做单位换算
-v|--verbose (x3) //查看规则列表时,显示更详细的信息
-line-numbers //查看规则表时,显示在链中的序号
-V|--version
-h|--help
[option] --help //查看特定选项的帮助,如iptables -p icmp --help
--fragment -f //match second or further fragments only
--modprobe=<command> //try to insert modules using this command
--set-counters PKTS BYTES //set the counter during insert/append
state TCP链接状态
NEW 第一次握手,要起始一个连接(重设连接或将连接重导向)
ESTABLISHED 数据包属于某个已经建立的连接。第二次和第三次握手 (ack=1)
INVALID 数据包的连接编号(Session ID)无法辨识或编号不正确。如SYN=1 ACK=1 RST=1
RELATED 表示该封包是属于某个已经建立的连接,所建立的新连接。如有些服务使用两个相关的端口,如FTP,21和20端口一去一回,FTP数据传输(上传/下载)还会使用特殊的端口只允许NEW和ESTABLISHED进,只允许ESTABLISHED出可以阻止反弹式木马。
使用示例:
iptables -F //删除iptables现有规则
iptables -L [-v[vv] -n] //查看iptables规则
iptables -A INPUT -i eth0 -p tcp --dport 80 -m state --state NEW,ESTABLISHED -j ACCEPT //在INPUT链尾添加一条规则
iptables -I INPUT 2 -i eth0 -p tcp --dport 80 -m state --state NEW,ESTABLISHED -j ACCEPT //在INPUT链中插入为第2条规则
iptables -D INPUT 2 //删除INPUT链中第2条规则
iptables -R INPUT 3 -i eth0 -p tcp --dport 80 -m state --state NEW,ESTABLISHED -j ACCEPT //替换修改第三条规则
iptables -P INPUT DROP //设置INPUT链的默认策略为DROP
//允许远程主机进行SSH连接
iptables -A INPUT -i eth0 -p tcp --dport 22 -m state --state NEW,ESTABLISHED -j ACCEPT
iptables -A OUTPUT -o eth0 -p tcp --sport 22 -m state --state ESTABLISHED -j ACCEPT
//允许本地主机进行SSH连接
iptables -A OUTPUT -o eth0 -p tcp --dport 22 -m state --state NEW,ESTABLISHED -j ACCEPT
iptables -A INTPUT -i eth0 -p tcp --sport 22 -m state --state ESTABLISHED -j ACCEPT
//允许HTTP请求
iptables -A INPUT -i eth0 -p tcp --dport 80 -m state --state NEW,ESTABLISHED -j ACCEPT
iptables -A OUTPUT -o eth0 -p tcp --sport 80 -m state --state ESTABLISHED -j ACCEPT
//限制ping 192.168.146.3主机的数据包数,平均2/s个,最多不能超过3个
iptables -A INPUT -i eth0 -d 192.168.146.3 -p icmp --icmp-type 8 -m limit --limit 2/second --limit-burst 3 -j ACCEPT
//限制SSH连接速率(默认策略是DROP)
iptables -I INPUT 1 -p tcp --dport 22 -d 192.168.146.3 -m state --state ESTABLISHED -j ACCEPT
iptables -I INPUT 2 -p tcp --dport 22 -d 192.168.146.3 -m limit --limit 2/minute --limit-burst 2 -m state --state NEW -j ACCEPT
//防止syn攻击(限制syn的请求速度)
iptables -N syn-flood
iptables -A INPUT -p tcp --syn -j syn-flood
iptables -A syn-flood -m limit --limit 1/s --limit-burst 4 -j RETURN
iptables -A syn-flood -j DROP
//防止syn攻击(限制单个ip的最大syn连接数)
iptables –A INPUT –i eth0 –p tcp --syn -m connlimit --connlimit-above 15 -j DROP
iptables -I INPUT -p tcp -dport 22 -m connlimit --connlimit-above 3 -j DROP //利用recent模块抵御DOS攻击
iptables -I INPUT -p tcp --dport 22 -m state --state NEW -m recent --set --name SSH //单个IP最多连接3个会话
Iptables -I INPUT -p tcp --dport 22 -m state NEW -m recent --update --seconds 300 --hitcount 3 --name SSH -j DROP //只要是新的连接请求,就把它加入到SSH列表中。5分钟内你的尝试次数达到3次,就拒绝提供SSH列表中的这个IP服务。被限制5分钟后即可恢复访问。
iptables -I INPUT -p tcp --dport 80 -m connlimit --connlimit-above 30 -j DROP //防止单个IP访问量过大
iptables –A OUTPUT –m state --state NEW –j DROP //阻止反弹木马
iptables -A INPUT -p icmp --icmp-type echo-request -m limit --limit 1/m -j ACCEPT //防止ping攻击
//只允许自己ping别人,不允许别人ping自己
iptables -A OUTPUT -p icmp --icmp-type 8 -j ACCEPT
iptables -A INPUT -p icmp --icmp-type 0 -j ACCEPT
//对于127.0.0.1比较特殊,我们需要明确定义它
iptables -A INPUT -s 127.0.0.1 -d 127.0.0.1 -j ACCEPT
iptables -A OUTPUT -s 127.0.0.1 -d 127.0.0.1 -j ACCEPT
//SNAT 基于原地址转换。许多内网用户通过一个外网 口上网的情况。将我们内网的地址转换为一个外网的IP,共用外网IP访问外网资源。
iptables -t nat -A POSTROUTING -s 192.168.10.0/24 -j SNAT --to-source 172.16.100.1
//当外网地址不是固定的时候。将外网地址换成 MASQUERADE(动态伪装):它可以实现自动读取外网网卡获取的IP地址。
iptables -t nat -A POSTROUTING -s 192.168.10.0/24 -j MASQUERADE
//DNAT 目标地址转换。目标地址转换要做在到达网卡之前进行转换,所以要做在PREROUTING这个位置上
iptables -t nat -A PREROUTING -d 192.168.10.18 -p tcp --dport 80 -j DNAT --to-destination 172.16.100.2
FirewallD
FirewallD与iptables关系:
firewalld底层仍旧是基于iptables的,但还是有很多不同的地方:
iptables在 /etc/sysconfig/iptables 中储存配置,而 firewalld 将配置储存在 /usr/lib/firewalld/ 和 /etc/firewalld/ 中的各种 XML 文件里,其中前者是默认的配置,请不要修改。可以在/etc/firewalld/中编辑自己的配置,firewalld优先使用/etc/firewalld/中的配置。使用 iptables,每一个单独更改意味着清除所有旧有的规则和从 /etc/sysconfig/iptables里读取所有新的规则,然而使用 firewalld 却不会再创建任何新的规则;仅仅运行规则中的不同之处。因此firewalld可以在运行时间内,改变设置而不丢失现行连接。
firewalld中zone概念(区域)
RHEL7中的不过貌似其实现方式还是和iptables一样的,但是不像mariaDB那样兼容MySQL命令,FirewallD无法解析由 ip*tables 和 ebtables 命令行工具添加的防火墙规则。
FirewallD使用区域(zone)的概念来管理,每个网卡对应一个zone,这些zone的配置文件可在/usr/lib/firewalld/zones/下看到,默认的是public.由firewalld 提供的区域按照从不信任到信任的顺序排序:
drop(丢弃)任何流入网络的包都被丢弃,不作出任何响应。只允许流出的网络连接。
block(阻塞)任何进入的网络连接都被拒绝,并返回 IPv4 的 icmp-host-prohibited 报文或者 IPv6 的 icmp6-adm-prohibited 报文。只允许由该系统初始化的网络连接。
public(公开) 在用以可以公开的部分。你认为网络中其他的计算机不可信并且可能伤害你的计算机。只允许选中的连接接入。
external(外部)用在路由器等启用伪装的外部网络。你认为网络中其他的计算机不可信并且可能伤害你的计算机。只允许选中的连接接入。
dmz(隔离区)用以允许隔离区(dmz)中的电脑有限地被外界网络访问。只接受被选中的连接。
work(工作)用在工作网络。你信任网络中的大多数计算机不会影响你的计算机。只接受被选中的连接。
home(家庭)用在家庭网络。你信任网络中的大多数计算机不会影响你的计算机。只接受被选中的连接。
internal(内部)用在内部网络。你信任网络中的大多数计算机不会影响你的计算机。只接受被选中的连接。
trusted(信任)允许所有网络连接。
firewalld中的过滤规则
source: 根据源地址过滤
interface: 根据网卡过滤
service: 根据服务名过滤
port: 根据端口过滤
icmp-block: icmp 报文过滤,按照 icmp 类型配置
masquerade: ip 地址伪装
forward-port: 端口转发
rule: 自定义规则
其中,过滤规则的优先级遵循如下顺序
source
interface
conf
firewalld常用命令
fierwalld可以直接修改配置文件进行配置,也可以通过配置工具的命令,这里因为是远程操作为了确保开启后ssh端口是开放的,所以直接修改配置文件。
先查看/etc/firewalld/firewalld.conf中DefaultZone的值,默认是DefaultZone=public,这时/etc/firewalld/zones/目录下应该有个public.xml文件,vi打开它修改成:
<?xml version="1.0" encoding="utf-8"?>
<zone>
<short>Public</short>
<description>For use in public areas. You do not trust the other computers on networks to not harm your computer. Only selected incoming connections are accepted.</description>
<service name="dhcpv6-client"/>
<service name="ssh"/>
<service name="http"/>
<service name="https"/>
</zone>
这就代表在public zone中开放ssh(22)、http(80)、https(443)端口,其中对应每一个在/usr/lib/firewalld/services/下*.xml文件定义好的服务类型,比如http.xml文件如下:
<?xml version="1.0" encoding="utf-8"?>
<service>
<short>WWW (HTTP)</short>
<description>HTTP is the protocol used to serve Web pages. If you plan to make your Web server publicly available, enable this option. This option is not required for viewing pages locally or developing Web pages.</description>
<port protocol="tcp" port="80"/>
</service>
所以也可以直接在public.xml中这样:
<?xml version="1.0" encoding="utf-8"?>
<zone>
<short>Public</short>
<description>For use in public areas. You do not trust the other computers on networks to not harm your computer. Only selected incoming connections are accepted.</description>
<service name="dhcpv6-client"/>
<service name="ssh"/>
<port protocol="tcp" port="80"/> #等效的
<service name="https"/>
</zone>
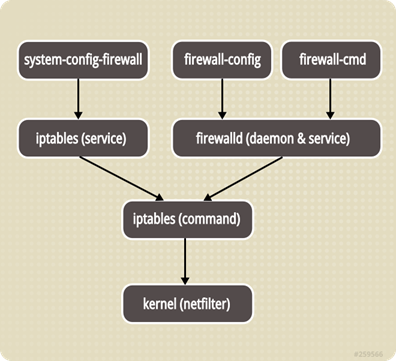
每次改配置文件还是比较麻烦的,firewalld可以使用firewall-config和firewall-cmd进行配置,前者是由于GUI模式下,后者为命令行下工具,一些常用命令如下:
systemctl start firewalld #启动
systemctl status firewalld #或者firewall-cmd –state 查看状态
sytemctl disable firewalld #停止并禁用开机启动
systemctl enable firewalld #设置开机启动
systemctl stop firewalld #禁用
firewall-cmd –version #查看版本
firewall-cmd –help #帮助信息
firewall-cmd –get-active-zones#查看区域信息
firewall-cmd –get-zone-of-interface=eth0#查看指定接口所属区域
firewall-cmd –panic-on #拒绝所有包
firewall-cmd –panic-off #取消拒绝状态
firewall-cmd –query-panic #查看是否拒绝
firewall-cmd –reload #更新防火墙规则
firewall-cmd –complete-reload #断开再连接
firewall-cmd –zone=public –add-interface=eth0 #将接口添加到public区域,默认接口都在public。若加上–permanet则永久生效
firewall-cmd –set-default-zone=public #设置public为默认接口区域
firewall-cmd –zone=pulic –list-ports #查看所有打开的端口
firewall-cmd –zone=pulic –add-port=80/tcp #把tcp 80端口加入到区域
firewall-cmd –zone=public –add-service=http #把http服务加入到区域
firewall-cmd –zone=public –remove-service=http #移除http服务
部分命令共同的参数说明:
–zone=ZONE 指定命令作用的zone,省缺的话命令作用于默认zone
–permanent 有此参数表示命令只是修改配置文件,需要reload才能生效;无此参数则立即在当前运行的实例中生效,不过不会改动配置文件,重启firewalld服务就没效果了。
–timeout=seconds 表示命令效果持续时间,到期后自动移除,不能和–permanent同时使用。例如因调试的需要加了某项配置,到时间自动移除了,不需要再回来手动删除。也可在出现异常情况时加入特定规则,过一段时间自动解除。
Using Firewalld in CentOS 7(转发外文,个人认为不错)
1、Installing Firewalld
Firewalld is easily installed using the following commands:
yum -y install firewalld
systemctl enable firewalld
2、Checking the status of Firewalld
Before you continue with the configuration of Firewalld, it is wise to check that it indeed works correctly. You do this with the command:
systemctl status firewalld
If there are no problems, the input will look like this:
centos 7 firewalld status
If it does not state that Firewalld is active, try to restart it with:
systemctl restart firewalld
Does Firewalld still not start? Check for possible error messages to solve the problem with:
journalctl -xe -u firewalld
3、Zones
Firewalld uses zones, but what does this mean? With a zone, you actually indicate in what kind of environment your internet connection is located and how much you trust it, for example, a public, home or work connection. This is especially useful if you use a private network, for example, or use CentOS 7 on a laptop and work from different locations. You can then configure different zones in advance, and adjust your active zone depending on where you are.
By configuring different zones, you can distinguish between which services / ports are accessible, depending on where you are and which zone you use. You often use only one zone on a VPS because the VPS does not change from home / work / public environment.
Out-of-the-box, Firewalld comes with the following zones:
drop: All incoming connections are rejected. Outbound connections are possible.
block: All incoming connections are denied with a default message for the source of the incoming connection. For IPv4, this is icmp-host-prohibited and for IPv6 icmp6-adm-prohibited (ICMP is a default for sending information and error messages in IP traffic). Outgoing connections are possible.
public: Use this zone for public environments in which you do not trust other computers on the network. Only predefined connections (i.e. ports / services) are accepted.
external: This is mainly focused on if your firewall works as a gateway and NAT masquerading is used. You do not trust other computers on the network and only preconfigured connections are accepted.
dmz: The demilitarized zone, where the computer / server is isolated on the network and does not have access to other computers / servers. Only specific connections are accepted.
work: For work environments. Usually, other computers are trusted on the same network. Again, only predefined connections are accepted.
home: For home use. The same applies as in the 'work' zone. Note that connections at work are often better secured than at a home network.
internal: For use with private networks. Computers on this network are usually trusted. Only predefined connections are accepted.
trusted: All connections are accepted.
4、Managing zones
Firewalld comes with a range of useful commands to manage your zones. In this section, we explain the most important.
Checking the default zone
By default, the 'public' zone is the default zone. You check the default zone with the command:
firewall-cmd --get-default-zone
Checking the active zone
It may happen that you change the active zone, but not the default zone. You check the active zone and the network interfaces for which they are used with:
firewall-cmd --get-active-zones
Check the available zones
You check the available zones with the command:
firewall-cmd --get-zones
This is especially useful if you want to change zones and first want to see your options.
Detailed zone information
Detailed information such as authorized services and porting, but also port forwarding etc. can be viewed with:
firewall-cmd --zone=public --list-all
Change 'public' to the desired zone, or view the output for all zones with:
firewall-cmd --list-all-zones | more
Changing the default zone
To change the default zone, you have two options: change the zone for all interfaces, or per interface. Suppose you use one network interface (and not also a private network), then the use of one zone is sufficient, and you might then just as well adjust the default zone when changing zones.
Adjust the zone for all interfaces:
firewall-cmd --set-default-zone=public
Replace public with the name of the desired zone
Adjust the zone for specific interfaces:
firewall-cmd --zone=public --change-interface=eth0
Replace public with the name of the desired zone, and eth0 with the name of the desired network interface. This way, you can also change the zones per interface for private networks, for example:
firewall-cmd --zone=public --change-interface=eth0
firewall-cmd --zone=internal --change-interface=eth1
5、Opening ports
You can open ports in Firewalld or add services to give network access to applications. Not every application comes with a service, or maybe you changed the default port of the service (e.g. for SSH). In that case, you open one or more specific ports.
Every change in this part is only active after a restart of your VPS, or by reloading your configuration with:
firewall-cmd --reload
Opening a single port
You open a port with the command:
firewall-cmd --zone=public --permanent --add-port=1234/tcp
Replace public with the desired zone, --permanent ensures that the change remains intact even after a restart
Opening Ranges
Would you rather open a range? Then you use the command:
firewall-cmd --zone=public --permanent --add-port=1234-1345/tcp
Replace 1234-1345 with the actual port range you want to open.
Access per IP
Instead of opening a port for the whole wide world, you may also open it for a specific IP only using the commands:
firewall-cmd --permanent --zone=public --add-rich-rule='
rule family="ipv4"
source address="1.2.3.4"
port protocol="tcp" port="1234" accept'
Replace 1.2.3.4 by the client's actual IP address and 1234 by the port you'd like to open. Repeat these steps to whitelist multiple IP's and reload your configuration afterwards (firewall-cmd --reload). Don't forget to remove the general rule if the corresponding port was already opened prreviously.
Checking open ports
Over time, you may forget which ports are open. You check them with the command:
firewall-cmd --zone=public --permanent --list-ports
6、Closing ports
The closing of ports works almost the same as opening a port and you do it with the command:
firewall-cmd --zone=public --permanent --remove-port=1234/tcp
firewall-cmd --reload
replace 1234 with the desired port number, or use 1234-1345/tcp as syntax to delete a port range
firewall-cmd --reload immediately updates your configuration change
Adjusting the configuration directly
In addition to the above commands, you can also directly adjust the configuration file of a specific zone. You can find the configuration files of the zones with:
ls /etc/firewalld/zones
In a new installation, only public.xml and public.xml.old will be listed here. You can open and edit it with the command:
vim /etc/firewalld/zones/public.xml
You can open services or ports by respectively placing the following additions in the file:
<service name="servicenaam"/>
<port protocol="tcp" port="1234"/>
Replace service name with the actual name of the service, for example, ssh.
Replace 1234 with the desired number and tcp with udp if you are sure you want to open the udp port.
Do you want to create a new configuration file for another zone, for example, home? Then the public.xml.old is a great starting point. You change public.xml.old to a file for another zone by copying it with:
cp /etc/firewalld/zones/public.xml.old /etc/firewalld/zones/home.xml
Replace home with the name of the desired zone.
7、Adding services
In addition to opening ports, you can also open specific services in Firewalld. You then add the service in Firewalld and one or more ports are then opened. There is a side note here:
Firewalld uses configuration files (see available services) in which the ports of different services are defined. These ports are opened when the service is added. For example, if you change your SSH port, if you have added the SSH service, the new port will not be automatically open unless you open the port manually or adjust the configuration of the service in Firewalld.
You open services in Firewalld with the following command, where you replace SSH with the relevant service name:
firewall-cmd --zone=public --permanent --add-service=ssh
firewall-cmd --reload
Checking available services
There are two ways to see which services are available for use with Firewalld:
firewall-cmd --get-services
In more detail by viewing the relevant configuration. You can find the configuration files of the available service in the /usr/lib/firewalld folder using:
ls /usr/lib/firewalld/services
The contents of the available files can be viewed with:
more /usr/lib/firewalld/services/servicenaam.xml
You can optionally edit one of the configuration files with nano or vi, for example, to adjust the default port.
8、Removing services
You can remove a service just as easily as you add it in Firewalld:
firewall-cmd --zone=public --permanent --remove-service=ssh
firewall-cmd --reload
9、Blocking IPs
It can happen that your VPS is bombarded with brute-force attacks by bots. We advise you to solve this by using Fail2Ban, but you can also manually block IPs. You do this with the commands:
firewall-cmd --permanent --add-rich-rule="rule family='ipv4' source address='123.123.123.0/24' reject"
firewall-cmd --reload
Replace 123.123.123.0/24 with the specific IP range you want to block, or with a specific IP address if you want to block one IP.
Alternatively, you can also turn this principle around and block access to a port for everyone and only allow specific IPs. You first remove the relevant port:
firewall-cmd --zone=public --permanent --remove-port=1234/tcp
Replace public with the relevant zone, 1234 and tcp with the desired port/protocol. Then, you can access specific IPs with the commands:
firewall-cmd --permanent --zone=public --add-rich-rule='rule family="ipv4" source address="1.2.3.4" port protocol="tcp" port="1234" accept'
firewall-cmd --reload
If necessary, replace public with the desired zone, 1.2.3.4. with the correct IP and 1234 and tcp with the correct port number/protocol.
Checking blocked ports
Suppose that an IP address has problems reaching a service on your VPS, it is then useful to exclude if it is blocked on your VPs. You do this with the command:
firewall-cmd --list-all
10、Unblocking IPs
To unblock IPs blocked in Firewalld, can in a way, you reverse the commands from the previous section. Suppose you have blocked an IP/IP range, you then use the syntax:
firewall-cmd --permanent --remove-rich-rule="rule family='ipv4' source address='123.123.123.0/24' reject"
firewall-cmd --reload
Do not forget to adjust the IP here. Have you given a specific IP address access to a port and do you want to undo it? Then use:
firewall-cmd --permanent --zone=public --remove-rich-rule='rule family="ipv4" source address="1.2.3.4" port protocol="tcp" port="1234" accept'
firewall-cmd --reload
该文章最后由 阿炯 于 2023-01-10 13:27:42 更新,目前是第 2 版。